Day5 前置基础知识-Nginx
1. Nginx 功能介绍
在 Web 架构与网络安全领域,Nginx 是使用最广泛的中间件之一。其高性能、高并发特性使其成为企业级应用的 “标配” 组件(百度、阿里、腾讯等均大规模使用)。掌握 Nginx 的基础功能,是理解 Web 服务部署、反向代理配置及后续安全防护(如 WAF 集成、漏洞防护)的关键前提。
1.1 Nginx 介绍
Nginx:engine X ,2002年开始开发,2004年开源,2019年3⽉11⽇,Nginx公司被F5 Networks以6.7亿美元收购。
Nginx 是免费的、开源的、⾼性能的HTTP和反向代理服务器、邮件代理服务器、以及TCP/UDP代理服务器解决C10K问题(10K Connections)
Nginx官网: http://nginx.org/
Nginx 商业版为 Nginx Plus: https://www.nginx.com/products/nginx/
Nginx ⼆次发行版:
- Tengine:由淘宝⽹发起的Web服务器项⽬。它在Nginx的基础上,针对⼤访问量⽹站的需求,添加了很多⾼级功能和特性。Tengine的性能和稳定性已经在⼤型的⽹站如淘宝⽹,天猫商城等得到了很好的检验。它的最终⽬标是打造⼀个⾼效、稳定、安全、易⽤的Web平台,从2011年12⽉开始,Tengine成为⼀个开源项⽬,官⽹ http://tengine.taobao.org/
- OpenResty:基于 Nginx 与 Lua 语⾔的⾼性能 Web 平台, 章亦春团队开发,官⽹ http://openresty.org/cn/
Nginx的核心设计目标是解决传统 Web 服务器(如 Apache)在高并发场景下的性能瓶颈 ——Apache 采用 “多进程 / 多线程” 模型,每个连接对应一个进程 / 线程,高并发时会占用大量内存和 CPU 资源;而 Nginx 采用 “异步非阻塞” 模型,单进程可处理数万并发连接,资源占用极低(即使并发量达 10 万,内存占用通常也仅数百 MB)。
目前 Nginx 的应用场景主要包括:
- Web 服务器:直接部署静态资源(HTML、CSS、JS、图片等),替代 Apache 处理静态请求。
- 反向代理服务器:接收客户端请求,转发到后端业务服务器(如 Tomcat、Node.js),实现负载均衡和业务隔离。
- 负载均衡器:将高并发请求分发到多个后端服务器,避免单点故障,提升服务可用性。
- API 网关:统一管理 API 请求,实现请求过滤、身份验证、流量控制等功能。
- HTTPS 终端:集中处理 SSL/TLS 加密解密(减少后端服务器的加密开销),配置 SSL 证书实现 HTTPS 访问。
1.2 基础特性
Nginx 的流行源于其独特的技术特性,这些特性不仅决定了其高性能优势,也影响后续的安全配置策略:
| 特性 | 说明 | 安全关联 |
|---|---|---|
| 异步非阻塞 IO 模型 | 基于 epoll(Linux)、kqueue(FreeBSD)等 IO 多路复用技术,单进程可同时处理数千至数万并发连接。 | 低资源占用降低了 “资源耗尽攻击” 的风险,但仍需合理配置连接数上限,避免被恶意请求占满连接表。 |
| 轻量级架构 | 核心代码简洁,运行时内存占用极低(默认配置下,主进程 + 工作进程总内存通常 < 10MB)。 | 代码量少意味着潜在漏洞更少,降低了被攻击者利用的概率。 |
| 高可靠性 | 采用 “主进程 + 工作进程” 模型,工作进程崩溃后,主进程会自动重启新的工作进程,确保服务不中断。 | 避免单点故障导致服务下线,提升攻击后的服务自愈能力。 |
| 跨平台支持 | 可运行于 Linux、FreeBSD、Windows 等多种操作系统(生产环境强烈推荐 Linux)。 | 生产环境优先选择 Linux,利用 Linux 的安全特性(如 SELinux、防火墙)增强整体安全性。 |
| 热部署能力 | 支持在不停止服务的情况下,更新配置文件 (nginx -s reload)、升级版本或更换 SSL 证书。 |
避免配置更新或版本升级时的服务中断,减少 “维护窗口” 带来的安全风险。 |
| 可扩展性 | 通过模块化设计支持功能扩展,可按需加载官方或第三方模块。 | 可集成第三方安全模块(如 ngx_waf)实现 SQL 注入、XSS 等漏洞防护。 |
1.3 Web 服务相关的功能
作为 Web 服务器,Nginx 提供了丰富的功能来满足静态资源部署、请求处理及服务优化需求:
静态资源处理
Nginx 对静态资源(HTML、CSS、JS、图片、视频等)的处理性能远超 Apache,支持:
- 按文件类型设置缓存策略(如对图片设置较长缓存,对 HTML 设置短期缓存);
- 压缩静态资源(gzip/brotli 压缩),减少传输带宽,提升访问速度;
- 防盗链配置(通过
valid_referers指令限制资源引用来源)。
虚拟主机(Virtual Host)
支持在同一台服务器上部署多个 Web 站点,通过以下方式区分:
- 基于域名:多个域名解析到同一 IP,Nginx 通过
Host请求头判断访问的站点; - 基于端口:同一 IP 的不同端口对应不同站点(如 80 对应站点 A,8080 对应站点 B);
- 安全意义:实现站点隔离,避免一个站点的漏洞影响其他站点(如站点 A 被入侵后,无法直接跨目录访问站点 B 的文件)。
- 基于域名:多个域名解析到同一 IP,Nginx 通过
反向代理与负载均衡
这是 Nginx 最核心的功能之一:
- 反向代理:客户端请求先发送到 Nginx,再由 Nginx 转发到后端业务服务器。后端服务器 IP 不暴露,降低被直接攻击的风险。
- 负载均衡:通过
upstream模块配置多个后端服务器,实现:- 分担后端服务器压力,避免单点过载;
- 故障自动剔除(健康检查),确保服务可用性;
- 隐藏后端架构,抵御针对特定后端服务的直接攻击。
HTTPS 与 SSL/TLS 配置
支持配置 SSL 证书,实现 HTTPS 加密传输:
- 启用 SSL 协议(推荐仅保留 TLSv1.2/TLSv1.3);
- 配置证书链(避免浏览器 “证书不信任” 警告);
- 启用 HTTP/2(大幅提升并发性能);
- 配置 HSTS,强制客户端使用 HTTPS 访问,防止 “降级攻击”。
请求限制与访问控制
提供多种机制保护 Web 服务免受恶意请求攻击:
- 连接限制(
limit_conn_module):限制单个 IP 的并发连接数; - 请求限制(
limit_req_module):限制单个 IP 的请求频率(防 CC 攻击); - 访问控制(
allow/deny指令):限制特定 IP 或网段的访问(如仅允许内网访问管理后台)。
- 连接限制(
2. Nginx 安装(Linux 环境)
推荐使用 Linux 环境。主要有两种方式:Yum 安装(简单、快捷)和 编译安装(灵活、可定制)。
2.1 基于 Yum 安装(快速部署)
步骤1:安装
# 安装
[root@localhost ~]# yum provides nginx
[root@localhost ~]# yum install nginx -y
# 启动
[root@localhost ~]# systemctl start nginx && systemctl enable nginx
# 查看Nginx状态,active即可
[root@localhost ~]# systemctl status nginx
# 关闭防火墙和SELINUX
[root@localhost ~]# systemctl stop firewalld && systemctl disable firewalld
[root@localhost ~]# setenforce 0
[root@localhost ~]# sed -i 's/SELINUX=enforcing/SELINUX=disabled/' /etc/selinux/config
# 测试
[root@localhost ~]# curl -I 127.0.0.1
HTTP/1.1 200 OK
Server: nginx/1.20.1
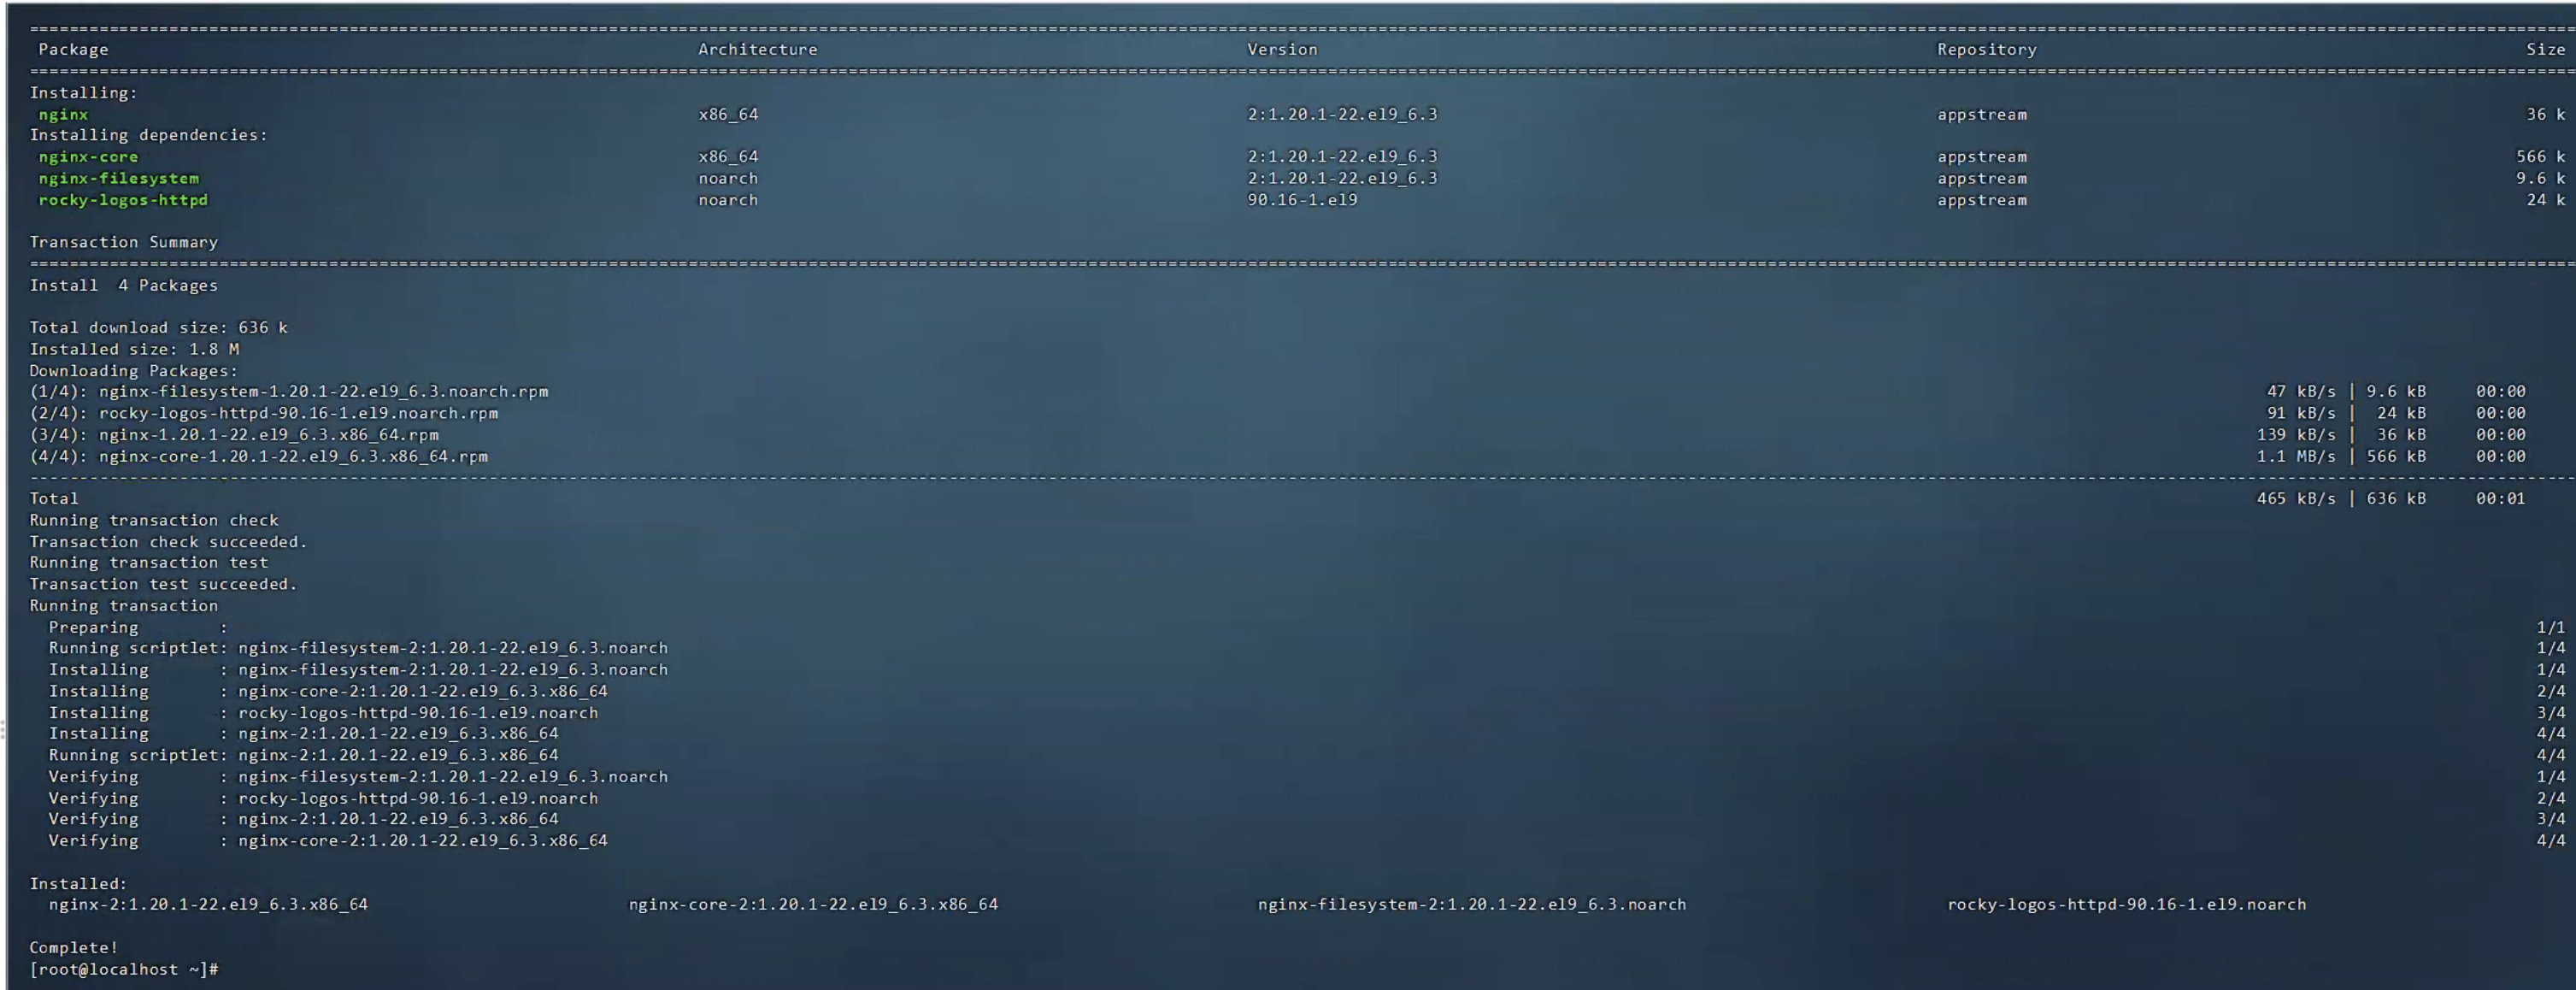
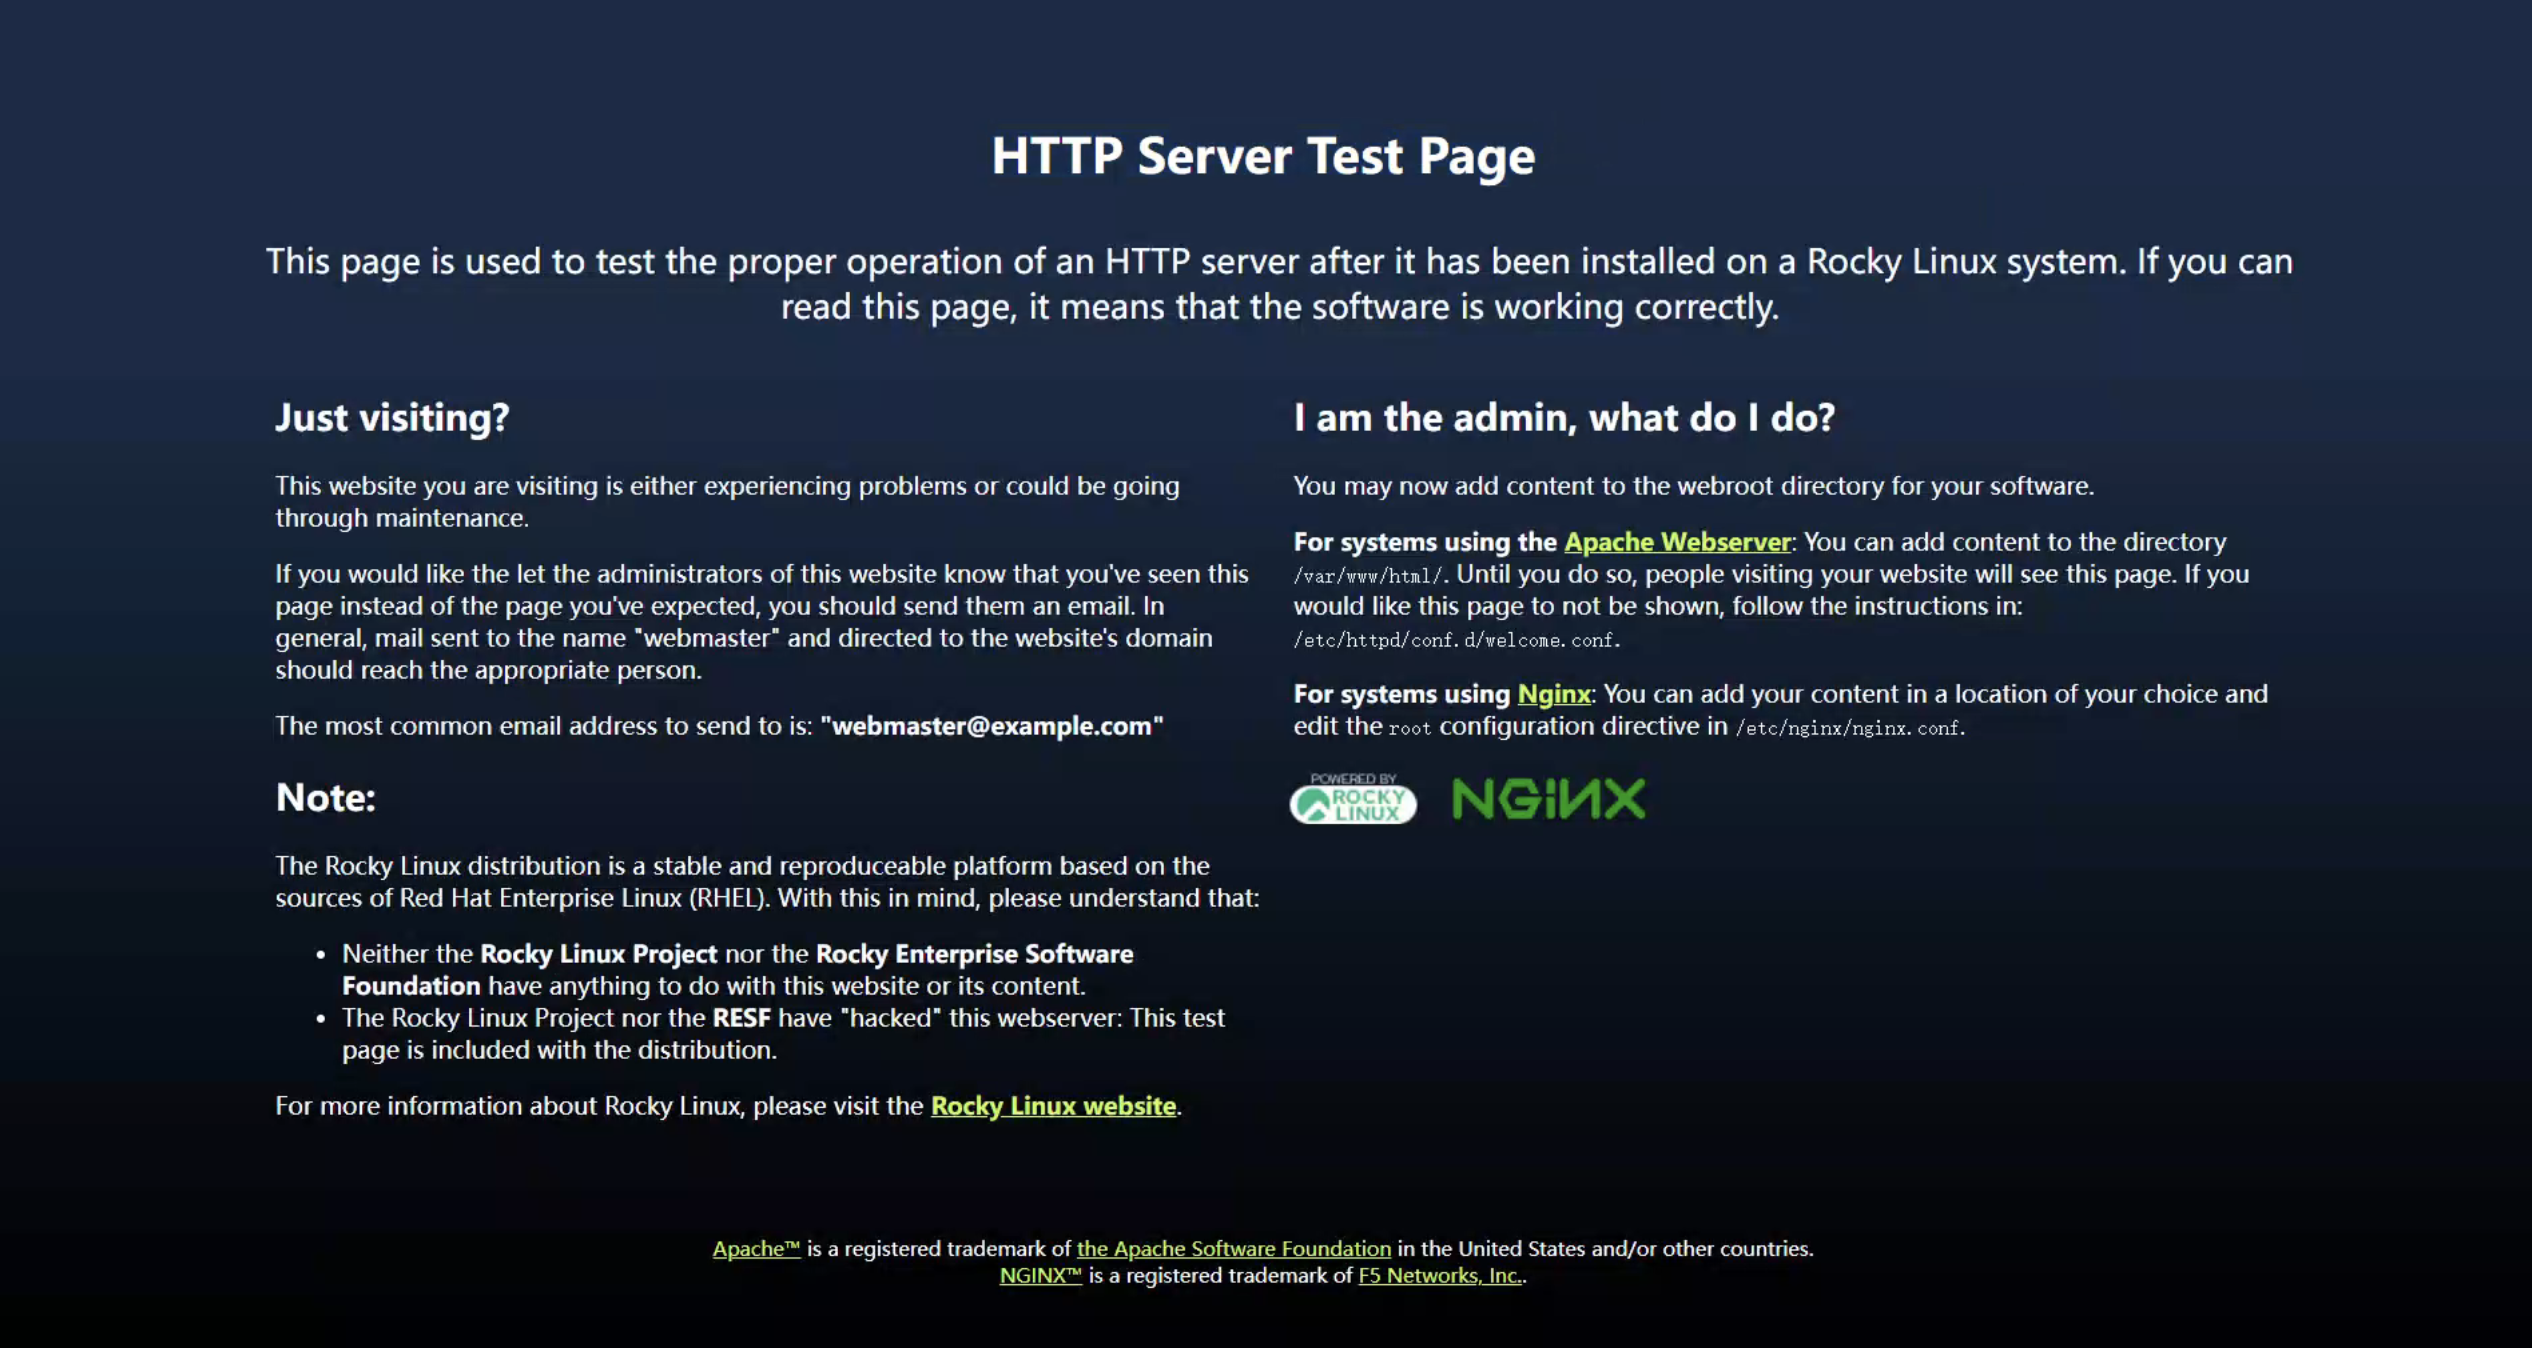
步骤 2:验证与关键目录
浏览器访问虚拟机 IP,看到 "HTTP Server Test Page" 即成功。
关键路径:
- 主配置:
/etc/nginx/nginx.conf - 网站根目录:
/usr/share/nginx/html/ - 日志目录:
/var/log/nginx/
2.2 编译安装(了解即可)
适合需要指定版本或集成第三方模块(如 WAF)的生产环境。
# 准备编译环境
[root@localhost ~]# yum -y install gcc pcre-devel openssl-devel zlib-devel
# 如果需要编译安装,为避免冲突需要将yum部署的nginx版本先卸载掉!
# 准备源码包
[root@localhost ~]# wget http://nginx.org/download/nginx-1.22.0.tar.gz -P /usr/local/src/
[root@localhost ~]# cd /usr/local/src && tar xzvf nginx-1.22.0.tar.gz
# 编译
[root@localhost ~]# useradd -r -s /sbin/nologin nginx
[root@localhost nginx-1.22.0]# ./configure --prefix=/apps/nginx \
  --user=nginx \
  --group=nginx \
  --with-http_ssl_module \
  --with-http_v2_module \
  --with-http_realip_module \
  --with-http_stub_status_module \
  --with-http_gzip_static_module \
  --with-pcre \
  --with-stream \
  --with-stream_ssl_module \
  --with-stream_realip_module \
  --with-file-aio
[root@localhost nginx-1.22.0]# make -j 2 && make install
# 善后工作
[root@localhost nginx-1.22.0]# chown -R nginx.nginx /apps/nginx
[root@localhost nginx-1.22.0]# ln -s /apps/nginx/sbin/nginx /usr/sbin/
[root@localhost nginx-1.22.0]# nginx -v
# systemd管理
[root@localhost ~]# cat << EOF > /usr/lib/systemd/system/nginx.service
[Unit]
Description=The nginx HTTP and reverse proxy server
Documentation=http://nginx.org/en/docs/
After=network.target remote-fs.target nss-lookup.target
Wants=network-online.target

[Service]
Type=forking
PIDFile=/apps/nginx/run/nginx.pid
ExecStart=/apps/nginx/sbin/nginx -c /apps/nginx/conf/nginx.conf
ExecReload=/bin/kill -s HUP $MAINPID
ExecStop=/bin/kill -s TERM $MAINPID

[Install]
WantedBy=multi-user.target
EOF
# 更新nginx.pid存储位置
[root@localhost ~]# mkdir /apps/nginx/run/
[root@localhost ~]# vim /apps/nginx/conf/nginx.conf
pid        /apps/nginx/run/nginx.pid;
# 启动
[root@localhost ~]# systemctl start nginx && systemctl enable nginx
# 关闭防火墙和SELINUX
[root@localhost ~]# curl -I 127.0.0.1
HTTP/1.1 200 OK
Server: nginx/1.22.0
3. Nginx基础
3.1 Nginx 命令
nginx 为 Nginx 服务软件的命令
[root@localhost ~]# nginx -h
nginx version: nginx/1.20.1
Usage: nginx [-?hvVtTq] [-s signal] [-p prefix]
             [-e filename] [-c filename] [-g directives]
常用选项
| 选项 | 说明 |
|---|---|
| -v | 输出版本 |
| -V | 编译相关选项 |
| -t | 测试验证配置文件的正确性 |
| -s | 发送信号指令给主进程 |
3.2 Nginx 架构和进程
Nginx 的高性能与高可靠性,与其独特的 “主从进程” 架构和 “异步非阻塞” 处理模型密切相关。
3.2.1 Nginx 架构
Nginx 采用 “模块化、事件驱动” 的架构,核心由三部分组成:
- 核心模块:Nginx 启动时必须加载的基础模块,负责进程管理、配置解析、网络事件驱动等。
- 功能模块:按需加载的模块,提供具体功能(如 HTTP 服务、负载均衡、SSL 加密等)。
- 事件驱动模型:基于 IO 多路复用技术(如 Linux 的 epoll),实现 “一个工作进程处理多个并发连接”。
架构流程:
- 启动时,主进程解析配置文件,初始化模块。
- 主进程创建多个工作进程(通常与 CPU 核心数一致)。
- 工作进程通过事件驱动模型,监听并处理客户端连接。
- 进程间通过共享内存或信号进行通信。
3.2.2 Nginx 进程结构
Nginx 启动后,系统中主要存在两类进程:主进程(Master Process) 和 工作进程(Worker Process)。
3.2.2.1 主进程(Master Process)
主进程是 “管理者”,不直接处理客户端请求。
- 职责:读取并验证配置文件、创建和管理工作进程、接收管理员信号(如 reload)、维护共享内存。
- 特点:通常由
root用户运行(因为需要绑定 80/443 等特权端口)。
3.2.2.2 工作进程(Worker Process)
工作进程是 “执行者”,直接处理客户端连接。
- 职责:监听端口、解析 HTTP 请求、处理业务逻辑(如读取文件或转发请求)、发送响应。
- 特点:通常由
nginx普通用户运行(安全隔离:即使工作进程被攻破,攻击者也无法直接获得 root 权限)。
3.2.2.3 进程结构示例
通过 ps aux | grep nginx 可查看进程状态:
[root@localhost ~]# ps -aux |grep nginx
root         842  0.0  0.0  11292  1604 ?        Ss   Nov27   0:00 nginx: master process /usr/sbin/nginx
nginx        844  0.0  0.1  15560  4932 ?        S    Nov27   0:00 nginx: worker process
nginx        845  0.0  0.1  15560  5060 ?        S    Nov27   0:00 nginx: worker process
nginx        846  0.0  0.1  15560  5060 ?        S    Nov27   0:00 nginx: worker process
nginx        847  0.0  0.1  15560  4932 ?        S    Nov27   0:00 nginx: worker process
3.2.3 Nginx 进程间通信
3.2.3.1 信号通信(主进程 → 工作进程)
管理员通过命令向主进程发送信号,主进程再控制工作进程:
| 信号 | 作用 | 触发命令示例 |
|---|---|---|
TERM / INT |
快速停止(立即关闭,可能中断请求) | nginx -s stop |
QUIT |
优雅停止(处理完当前请求后关闭) | nginx -s quit |
HUP |
热重载(重新读取配置,不中断服务) | nginx -s reload |
USR1 |
重读日志(用于日志切割) | nginx -s reopen |
USR2 |
平滑升级(启动新进程,配合 WINCH 使用) | kill -USR2 <PID> |
3.2.3.2 共享内存通信(工作进程 ↔ 工作进程)
用于进程间的数据共享,例如:
- 负载均衡状态:共享后端服务器的健康状态、连接数。
- 限流统计:
limit_req和limit_conn必须通过共享内存统计全局的请求速率,防止绕过限制。
示例配置(定义 10MB 共享内存):
# 定义名为 "req_limit" 的共享内存,大小10MB,用于请求频率限制
limit_req_zone $binary_remote_addr zone=req_limit:10m rate=10r/s;
3.2.4 连接建立和请求处理过程
以 “客户端访问静态资源” 为例,流程如下:
- TCP 连接建立:
- 客户端发送 SYN。
- Nginx 工作进程(通过 OS 内核)完成三次握手,建立 TCP 连接。
- HTTP 请求处理:
- 读取:工作进程读取 HTTP 请求报文。
- 解析:提取 Host、URI、User-Agent 等信息。
- 匹配:根据
server_name匹配虚拟主机,根据 URI 匹配location。 - 处理:定位本地文件(如
/usr/share/nginx/html/index.html),读取内容。
- 发送响应:
- 组装 HTTP 响应报文(状态码 200 + Header + Body)。
- 发送给客户端。
- 连接维持/关闭:
- 若为
Keep-Alive,保持连接等待下一次请求;否则关闭连接。
- 若为
3.3 Nginx模块分类
| 模块类型 | 定义 | 示例 |
|---|---|---|
| 核心模块 | Nginx 运行必须的基础模块,不可卸载。 | core, event |
| 标准模块 | 官方开发,编译时默认启用(可禁用)。 | http, proxy, upstream, ssl |
| 第三方模块 | 社区/企业开发,需手动编译集成。 | ngx_waf (安全), ngx_cache_purge (缓存清理) |
常见模块类型
- 核心模块:是 Nginx 服务器正常运行必不可少的模块,提供错误日志记录、配置文件解析、事件驱动机制、进程管理等核心功能
- 标准 HTTP 模块: 提供 HTTP 协议解析相关的功能,比如:端口配置、网页编码设置、HTTP 响应头设置 等等
- 可选 HTTP 模块: 主要用于扩展标准的 HTTP 功能,让 Nginx 能处理一些特殊的服务, 比如:Flash 多媒体传输、解析GeolP 请求、网络传输压缩、安全协议 SSL 支持等
- 邮件服务模块: 主要用于支持 Nginx 的邮件服务,包括对 POP3 协议、IMAP 协议和 SMTP 协议的支持
- Stream 服务模块: 实现反向代理功能包括TCP协议代理
- 第三方模块: 是为了扩展 Nginx 服务器应用,完成开发者自定义功能,比如: Json 支持、 Lua 支持等
部分第三方模块官方文档: http://nginx.org/en/docs/
# 编译时内置模块
[root@localhost ~]#  nginx -V 2>&1 | tr ' ' '\n' | grep module
# 动态加载模块
/usr/lib64/nginx/modules
3.4 Nginx相关文件
| 文件 | 说明 |
|---|---|
| /etc/nginx/nginx.conf | 主配置文件 |
| /var/log/nginx/ | 日志文件目录 |
| /usr/share/nginx/html/ | 默认站点根目录 |
| /usr/lib/systemd/system/nginx.service | Systemd服务文件 |
| /var/run/nginx.pid | 主进程ID文件 |
| /usr/share/nginx/modules | 动态加载模块目录 |
| /etc/nginx/conf.d/ | 子配置文件目录 |
/etc/nginx/nginx.conf 是 Nginx 的主配置文件,是总入口; /etc/nginx/conf.d/ 是业务配置文件目录,供主配置自动加载。
它们的关系就像:
- nginx.conf = 总纲领 / 主配置入口
- conf.d/ = 专门放各个网站/业务配置的子配置目录
3.4.1 /etc/nginx/nginx.conf —— 主配置文件(入口文件)
是 所有配置的根文件。Nginx 启动时 必须先加载它。
# 使用grep -Ev,扩展正则表达式,反向匹配,去掉空格和注释行的配置文件
[root@localhost ~]# grep -Ev '^$|^#|\s*#' /etc/nginx/nginx.conf
# 全局配置块
## 运行用户
user nginx;
## 工作进程数
worker_processes auto;
## 错误日志
error_log /var/log/nginx/error.log;
## pid文件存放位置
pid /run/nginx.pid;
## 动态加载模块配置
include /usr/share/nginx/modules/*.conf;
# events配置块
events {
    # 设置单个工作进程最大并发连接数
    worker_connections 1024;
}
# http配置块
http {
    ## 日志格式定义
    log_format  main  '$remote_addr - $remote_user [$time_local] "$request" '
                      '$status $body_bytes_sent "$http_referer" '
                      '"$http_user_agent" "$http_x_forwarded_for"';
    ## 访问日志
    access_log  /var/log/nginx/access.log  main;
    ## 启用 sendfile() - 利用操作系统内核的零拷贝技术:即数据拷贝无需切换至用户空间
    sendfile            on;
    ## 启用 TCP_NOPUSH - 优化网络包传输:即数据包填满时发送
    tcp_nopush          on;
    ## 启用  TCP_NODELAY - 减少延迟:即基于keepalive连接,尽快发送小数据包
    tcp_nodelay         on;
    ## keepalive 超时时间
    keepalive_timeout   65;
    ## 设置用于存储MIME类型映射的哈希表最大大小
    types_hash_max_size 4096;
    ## 定义文件扩展名与MIME类型的映射
    include             /etc/nginx/mime.types;
    ## 定义响应包默认MIME类型
    default_type        application/octet-stream;
    ## 加载子配置文件
    include /etc/nginx/conf.d/*.conf;
    # server配置块
    server {
        ## 监听ipv4和ipv6 80端口
        listen       80;
        listen       [::]:80;
        ## 定义虚拟主机的名称-域名
        server_name  _;
        ## 根目录
        root         /usr/share/nginx/html;
        ## 加载默认站点子配置文件
        include /etc/nginx/default.d/*.conf;
        ## 定义错误页
        error_page 404 /404.html;
        # location配置块
        location = /404.html {
        }
        error_page 500 502 503 504 /50x.html;
        location = /50x.html {
        }
    }
}

# 默认配置文件不包括下面两个块
# mail协议相关配置段
mail {
  ...
}
# stream服务器相关配置段
stream {
  ...
}
主要作用:
1.定义 Nginx 的基础结构(骨架)
例如:
events {}
http {}
这些不能放在其他地方。
2. 设置全局参数
如:
worker_processes auto;
error_log /var/log/nginx/error.log;
这些影响整个 Nginx。
3. 在 http {} 中加载其他配置文件
这是关键——nginx.conf 里有:
include /etc/nginx/conf.d/*.conf;
这意味着:
conf.d 目录中的所有 .conf 文件都会被自动加载进来。
3.4.2/etc/nginx/conf.d/ —— 业务配置目录(推荐放网站/反代/代理配置)
这个目录是专门存放:
- 网站 server 配置
- 反向代理配置
- HTTPS 配置
- 负载均衡 upstream
- 针对某业务的特殊 rules
比如:
/etc/nginx/conf.d/
├── default.conf
├── api.conf
├── blog.conf
└── upstream.conf
每个文件都可以独立写一个或多个 server {} 块。
Nginx 在加载 nginx.conf 时,看到 include,自动把这里的文件加载进去。
3.4.3 两者的关系
① nginx.conf 是父文件
② conf.d/*.conf 是子文件
③ nginx.conf 通过 include 把 conf.d 加载进来
结构关系图:
nginx.conf
│
├── 全局配置
├── events {}
└── http {}
       │
       ├── 全局 HTTP 设置
       └── include conf.d/*.conf  → 加载子配置
                │
                ├── default.conf → server {}
                ├── api.conf → server {}
                ├── upstream.conf → upstream {}
                └── ssl.conf → server { listen 443; }
为什么要分两个地方写?
1. 便于管理(一个网站一个文件)
比如:
- api 服务写在 api.conf
- blog 服务写在 blog.conf
不会混在一个大文件里。
2. 企业规范(多人协作不冲突)
多人一起维护 Nginx 时:
- 你改 myapp.conf
- 别人改 default.conf
- 不会互相覆盖、相互影响。
3. 升级 Nginx 不会覆盖你的业务配置
因为业务都放在 /etc/nginx/conf.d/ 下,升级时安全。
4. Default server 与业务 server 分开
官方安装会给你一个默认站点配置:
server {
    root /usr/share/nginx/html;
    ...
}
如果混在 nginx.conf 里,容易改坏。
总结:
| 文件/目录 | 作用 |
|---|---|
| /etc/nginx/nginx.conf | Nginx 的主配置文件,决定整体结构、加载其他配置 |
| /etc/nginx/conf.d/ | 存放各种业务/server/upstream 配置,由主配置 include 自动加载 |
| 关系 | nginx.conf 通过 include conf.d/*.conf 把所有业务配置整合进来 |
3.5 常用模块及配置示例
核心与标准 HTTP 模块
HTTP 核心配置 (http module)
http {                                 # 定义 HTTP 配置块,所有 Web 服务相关配置都写在这里
    include       mime.types;          # 引入文件类型映射表,识别 .html、.jpg 等文件类型
    default_type  application/octet-stream;  # 默认 MIME 类型,当无法识别文件类型时使用

    server {                           # 定义一个虚拟主机(网站)
        listen       80;               # 监听端口 80(HTTP 默认端口)
        server_name  www.example.com;  # 绑定域名(浏览器访问此域名时匹配到这个 server 块)
        location / {                   # 定义根路径的访问规则
            root   /usr/share/nginx/html;  # 网站根目录(实际文件所在位置)
            index  index.html;         # 默认访问的首页文件
        }
    }
}
反向代理 (proxy module)
location /api/ {                                        # 当访问路径以 /api/ 开头时,进入此配置
    proxy_pass http://192.168.1.100:8080/;              # 将请求转发到后端服务器(如 Tomcat)
    proxy_set_header Host $host;                        # 把原始 Host(域名)传给后端
    proxy_set_header X-Real-IP $remote_addr;            # 把真实客户端 IP 传给后端,用于日志/风控
}
负载均衡 (upstream module)
upstream backend_servers {                    # 定义一个后端服务器组名称(可以在 proxy_pass 中引用)
    ip_hash;                                  # 按客户端 IP 分配后端,实现会话保持(同一 IP 固定到同一服务器)
    server 192.168.1.100:8080 weight=3;       # 配置后端服务器,高权重表示接收请求更多
    server 192.168.1.101:8080 weight=2;       # 第二台服务器权重 2
    server 192.168.1.102:8080 backup;         # 备用服务器,只有前两台都不可用时才启用
}
HTTPS 加密 (ssl module)
server {
    listen 443 ssl;                                   # 监听 HTTPS 端口 443,并启用 SSL
    server_name www.example.com;                      # HTTPS 对应的域名

    ssl_certificate /etc/nginx/cert/site.pem;         # 公钥证书
    ssl_certificate_key /etc/nginx/cert/site.key;     # 私钥文件
    ssl_protocols TLSv1.2 TLSv1.3;                    # 仅启用安全版本的 TLS 协议
}
安全限流 (limit_req_module)
limit_req_zone $binary_remote_addr zone=req_limit:10m rate=10r/s;
# 定义限流区域:
# - 按客户端 IP ($binary_remote_addr) 限流
# - 分配名为 req_limit 的 10MB 内存区域
# - 平均限制为每秒 10 次请求

server {
    location / {
        limit_req zone=req_limit burst=20 nodelay;
        # 使用上面定义的限流规则
        # burst=20 → 允许瞬时请求高峰 20 个
        # nodelay → 超出立即拒绝,不排队
    }
}
常用第三方模块
ngx_waf:第三方 Web 应用防火墙,可防御 SQL 注入、XSS、目录遍历等攻击。ngx_http_stub_status_module:展示 Nginx 状态信息(active connections 等),常用于监控。
比如使用长亭雷池 Safeline WAF 提供的 .so 动态模块文件 作为示例。
Nginx 的第三方模块有两种类型:
| 模块类型 | 特点 | 加载方式 |
|---|---|---|
| 静态模块(static) | 编译进 nginx 可执行文件 | 需要重新编译 nginx |
动态模块(dynamic,.so 文件) |
独立文件,不需重新编译 | 使用 load_module 指令加载 |
Safeline WAF 提供 .so 文件 → 属于 动态模块
只需要在 nginx.conf 中 load_module 即可,无需编译。
假设 Safeline 给了:
/etc/nginx/modules/ngx_safeline_waf.so
那么你只需要在 nginx.conf 的 最顶部(任何 block 外) 加入:
load_module /etc/nginx/modules/ngx_safeline_waf.so;
注意位置:
- 必须写在 nginx.conf 最开始
- 不能写在 http{}, server{}, location{} 内部
- 多个动态模块可以多行 load_module
示例(推荐位置):
# 动态加载第三方模块
load_module /etc/nginx/modules/ngx_safeline_waf.so;
load_module /etc/nginx/modules/ngx_http_stub_status_module.so;

user nginx;
worker_processes auto;
...
状态监控配置示例
location /nginx_status {                  # 访问此路径显示 Nginx 运行状态
    stub_status on;                       # 开启状态页功能
    allow 192.168.1.0/24;                 # 仅允许内网访问,避免泄露敏感信息
    deny all;                             # 拒绝其他 IP 访问
}
3.6 虚拟主机
基于不同的IP、不同的端口以及不同的域名实现不同的虚拟主机,依赖于核心模块 ngxhttp core_module 实现
案例分析
- 定义 PC 站点,根目录为
/data/nginx/site01,直接通过x.x.x.x:8001 - 定义 Mobile 站点,根目录为
/data/nginx/site02,通过自定义域名访问 - 定义 Test 站点,根目录为
/data/nginx/site03, 仅能通过本地127.0.0.1:8003访问 - 定义 Test 站点,访问
127.0.0.1:8003/status,根目录为/data/nginx
[root@localhost ~]# mkdir -pv /data/nginx/site0{1..3}/
[root@localhost ~]# mkdir -pv /data/nginx/status
[root@localhost ~]# echo "Running 3 websites" > /data/nginx/status/index.html
[root@localhost ~]# echo "Hello PC Website!" > /data/nginx/site01/index.html
[root@localhost ~]# echo "Hello Moblie Website!" > /data/nginx/site02/index.html
[root@localhost ~]# echo "Hello Local Test Website!" > /data/nginx/site03/index.html
[root@localhost ~]# cat << EOF > /etc/nginx/conf.d/vhost.conf
# PC
server {
    listen  8001;
    location  / {
        root  /data/nginx/site01;
    }
}
# Mobile
server {
    listen 80;
    server_name m.test.com;
    location / {
        root /data/nginx/site02;
    }
}
# Test
server {
    listen 127.0.0.1:8003;
    location / {
        root /data/nginx/site03;
    }
    location /status {
        root /data/nginx;
    }
}
EOF
# 检查配置文件并重新加载
[root@localhost ~]# nginx -t
nginx: the configuration file /etc/nginx/nginx.conf syntax is ok
nginx: configuration file /etc/nginx/nginx.conf test is successful
[root@localhost ~]# nginx -s reload
# 测试验证
[root@localhost ~]# curl 172.16.175.129:8001
Hello PC Website!
[root@localhost ~]# curl -H 'Hostname: p.test.com' 172.16.175.129
Hello Moblie Website!
[root@localhost ~]# curl 172.16.175.129:8003
curl: (7) Failed to connect to 172.16.175.129 port 8003: Connection refused
# 定义 location 时:文件的绝对路径等于 root+location
[root@localhost ~]# curl -L 127.0.0.1:8003/status
Running 3 websites
Nginx Server 匹配优先级分析
配置加载顺序
http {
    include /etc/nginx/conf.d/*.conf;  # ← 先加载 vhost.conf
    server {                           # ← 后加载主 server 块
        listen 80;
        server_name _;
    }
}
加载顺序:
- vhost.conf 中的
server { listen 80; server_name m.test.com; }先加载 - nginx.conf 中的
server { listen 80; server_name _; }后加载
Nginx 匹配规则(关键)
对于相同 listen 端口的 server,Nginx 按以下规则选择:
| 请求 Host 头 | 匹配结果 | 生效的 Server |
|---|---|---|
m.test.com |
精确匹配 | vhost.conf (mobile) |
172.16.175.129 / 其他域名 |
无匹配,使用默认 server | vhost.conf (mobile) ← 意外结果 |
规则说明:
- 先精确匹配
server_name - 无匹配时,选择 第一个 监听该端口的 server 作为默认
- 不是选择
server_name _;的那个
通过调整加载顺序,设置默认Server
修改 /etc/nginx/nginx.conf,将 include 移到主 server 块之后:
http {
    server {              # ← 主 server 块先定义,成为真正的默认
        listen 80 default_server;  # ← 显式标记更保险
        server_name _;
        ...
    }
    include /etc/nginx/conf.d/*.conf;  # ← 移到后面
}
3.7 Location
Nginx 的 location 指令是配置请求路由的核心机制,其匹配规则基于 URI 和修饰符,优先级由匹配类型和顺序共同决定。
3.7.1 匹配类型与语法
location [ = | ~ | ~* | ^~ ] uri { ... }
| 修饰符 | 匹配类型 | 语法示例 | 说明 |
|---|---|---|---|
| = | 精确匹配 | location = /path | 仅当 URI 完全等于 /path 时匹配,优先级最高 |
| ^~ | 前缀匹配 | location ^~ /images/ | 匹配以 /images/ 开头的 URI,停止后续正则检查 |
| ~ | 正则匹配 | location ~ .php$ | 区分大小写,正则表达式匹配,按配置文件顺序匹配 |
| ~* | 正则匹配 | location ~* .(jpg,png)$ | 不区分大小写,正则表达式匹配,按配置文件顺序匹配 |
| 无修饰符 | 前缀匹配 | location /static/ | 匹配以 /static/ 开头的 URI,需继续正则检查 |
| / | 通用匹配 | location / | 匹配所有请求,优先级最低 |
优先级:= ^~ ~/~* 无修饰符 /
3.7.2 案例分析
官方案例
location = / {
    [ configuration A ]
}
location / {
    [ configuration B ]
}
location /documents/ {
    [ configuration C ]
}
location ^~ /images/ {
    [ configuration D ]
}
location ~* \.(gif|jpg|jpeg)$ {
    [ configuration E ]
}
# \: 转义字符
# 实际访问路径:root + 请求的路径
测试验证
- The "
/" request will match configuration A - the "
/index.html" request will match configuration B - the "
/documents/document.html" request will match configuration C - the "
/images/1.gif" request will match configuration D - the "
/documents/1.jpg" request will match configuration E
3.8访问控制
Nginx 的访问控制是保障服务器安全的核心机制,通过多种方式精细化管控请求入口
3.8.1 基于 IP
典型场景
# 黑名单:默认允许,拒绝特定IP
location /admin {
    deny 192.168.1.100;  # 拒绝单个 IP
    deny 10.0.0.0/8;     # 拒绝网段
    allow all;           # 允许其他 IP
}

# 白名单:默认拒绝,允许可信IP
location /api {
    allow 192.168.1.0/24;  # 允许网段
    allow 172.16.1.1;      # 允许单个 IP
    deny all;              # 拒绝其他
}
3.8.2 基于 HTTP 认证
典型场景
# 生成密码文件
## 首次创建
htpasswd -c /etc/nginx/.htpasswd admin
## 追加用户
htpasswd  /etc/nginx/.htpasswd root

# 后台管理
server {
    listen  8001;
    location  / {
        root  /data/nginx/site01;
    }
    location /admin{
        root /data/nginx/site01;  # 假设admin目录在site01下
        auth_basic "Tip: input password!";
        auth_basic_user_file /etc/nginx/.htpasswd;
    }
}
测试认证
# 失败测试(不带密码)
curl http://127.0.0.1:8001/admin/  # 应返回 401 Authorization Required

# 成功测试(带密码)
curl -u admin:yourpassword http://127.0.0.1:8001/admin/
3.8.3 案例分析
仅能够通过 admin 用户本地访问后台管理,其他所有IP和用户均不允许
# 准备实验环境
[root@localhost ~]# htpasswd -c /etc/nginx/.htpasswd admin
New password:
Re-type new password:
Adding password for user admin
[root@localhost ~]# mkdir -pv /data/nginx/site04/admin
[root@localhost ~]# echo "site04" > /data/nginx/site04/admin/index.html
[root@localhost ~]# cat << EOF > /etc/nginx/conf.d/site04.conf
server {
    listen  8004;
    # 精细化控制:基于请求属性
    if ($http_user_agent ~* bot) {
        return 403;
    }
    location  /admin {
        root  /data/nginx/site04;
        auth_basic "Tip: input password!";
        auth_basic_user_file /etc/nginx/.htpasswd;
        allow 127.0.0.1;
        deny all;
    }
}
EOF
[root@localhost ~]# nginx -t
nginx: the configuration file /etc/nginx/nginx.conf syntax is ok
nginx: configuration file /etc/nginx/nginx.conf test is successful
[root@localhost ~]# nginx -s reload
# 测试验证
client01 ~ % curl -I 172.16.175.129:8004/admin
HTTP/1.1 403 Forbidden
[root@localhost ~]# curl -u admin:123 http://127.0.0.1:8004/admin/
site04
[root@localhost ~]# curl -I -u root:123 http://127.0.0.1:8004/admin/
HTTP/1.1 401 Unauthorized
## 模拟 bot 访问
[root@localhost ~]# curl -I -u root:123 -H 'User-agent: bot' http://127.0.0.1:8004/admin/
HTTP/1.1 403 Forbidden
3.9 日志相关(重点)
3.9.1 Nginx 日志默认路径
Nginx 有两类日志:
1)访问日志(access log)
记录每个请求的详细信息 默认路径:
/var/log/nginx/access.log
内容示例:
192.168.1.5 - - [28/Nov/2025:21:52:03 +0800] "GET /login HTTP/1.1" 200 532 "-" "Mozilla/5.0"
2)错误日志(error log)
记录系统错误、配置问题、故障信息 默认路径:
/var/log/nginx/error.log
内容示例:
2025/11/28 21:53:21 [error] 1423#1423: *10 open() "/var/www/html/admin.php" failed (2: No such file or directory)
3.9.2 日志路径在哪里配置
在 nginx.conf 里:
http级别:访问日志格式与文件路径配置
log_format main '$remote_addr - $remote_user [$time_local] "$request" '
                '$status $body_bytes_sent "$http_referer" '
                '"$http_user_agent" "$http_x_forwarded_for"';

access_log /var/log/nginx/access.log main;
error_log 在 http 外写
error_log /var/log/nginx/error.log;
可以为不同 server 指定不同日志:
server {
    access_log /var/log/nginx/site1.log main;
}
3.9.3 Nginx 日志与安全有什么关系?
日志是 运维、安全监控、溯源 的核心来源。 它能看到所有访问行为、攻击行为、扫描行为。
1. 能看到攻击行为
例如 XSS 尝试:
GET /?q=<script>alert(1)</script>
SQL注入:
GET /login.php?id=1 OR 1=1
目录扫描器(dirsearch、Nmap):
"Mozilla/5.0 dirsearch/v0.4"
爆破行为(短时间大量 POST):
POST /login # 1 秒几十次
2. 能检查真实来源 IP
通过 access.log 看到:
X-Forwarded-For
用于判断是否被伪造、是否绕过 WAF。
3. 能定位故障与漏洞
例如:
[crit] open() "/var/www/html/.git/config" failed
说明有人扫描 .git 暴露漏洞。
4. 可用于取证与日志审计
例如攻击后调查攻击路径。
3.9.4 如何查看 Nginx 日志?
实时查看
tail -f /var/log/nginx/access.log
查看错误日志
tail -f /var/log/nginx/error.log
查看最近 100 行
tail -n 100 /var/log/nginx/access.log
搜索某个 IP 的记录
grep "192.168.1.5" /var/log/nginx/access.log
搜索异常状态码(如 404、500)
grep " 404 " /var/log/nginx/access.log | tail
grep " 500 " /var/log/nginx/error.log
搜索可能的攻击关键字
grep -Ei "select|union|sleep|alert|script" /var/log/nginx/access.log
查看当天的访问量
awk '{print $1}' access.log | wc -l
3.9.5 完整安全日志分析示例
假设 access.log 出现:
223.5.5.5 - - [...] "GET /admin.php HTTP/1.1" 404
223.5.5.5 - - [...] "GET /.env HTTP/1.1" 404
223.5.5.5 - - [...] "GET /phpmyadmin/ HTTP/1.1" 404
说明有人在扫描你的服务器弱点。
如果出现:
POST /login 200 20次/秒
说明有人在暴力破解密码。
如果错误日志出现:
FastCGI sent in stderr: "Primary script unknown" ...
说明 PHP 路由错误或被探测漏洞。
3.9.6 如何将日志用于安全加固?
1)因为可以看到攻击 → 可以写规则防护
如:
location / {
    if ($query_string ~* "(select|union|sleep|from)") {
        return 403;
    }
}
2)因为可以看到恶意 IP → 可以加入黑名单
deny 223.5.5.5;
3)因为可以看到爆破行为 → 可以限流
limit_req zone=req_limit burst=20;
4)配合 WAF(如 Safeline)可以自动挡攻击
访问日志也能验证 WAF 是否生效。
3.10 常用变量
常用内置变量
$remote_addr;
# 存放了客户端的地址,注意是客户端的公网IP
$proxy_add_x_forwarded_for;
# 此变量表示将客户端IP追加请求报文中X-Forwarded-For首部字段,多个IP之间用逗号分隔,如果请求中没有X-Forwarder-For,就使用$remote_addr
$args;
# 变量中存放了URL中的参数
$document_root;
# 保存了针对当前资源的系统根目录
$document_uri;
# 保存了当前请求中不包含参数的URI,注意是不包含请求的指令,比如/img/logo.png
$host;
# 存放了请求的host名称
limit_rate 10240;
echo $limit_rate;
# 如果nginx服务器使用limit_rate配置了显示网络速率,则会显示,如果没有设置,则显示0
$remote_port;
# 客户端请求Nginx服务器时随机打开的端口,这是每个客户端自己的端口
$remote_user;
# 已经经过Auth Basic Module验证的用户名
$request_body_file;
# 做反向代理时发给后端服务器的本地资源的名称
$request_method;
# 请求资源的方式,GET/PUT等等
$request_filename;
# 当前请求的资源文件的磁盘路径,由root或alias指令与URL请求生成的文件绝对路径
# /apps/nginx/html/www/index.html
$request_uri;
# 包含请求参数的原始URI,不包含主机名,相当于:$document_uri?$args
$scheme;
# 请求的协议,例如:http,https,ftp等等
$server_protocol;
# 保存了客户端请求资源使用的协议版本,例如:HTTP/1.0,HTTP/1.1,HTTP/2.0等等
$server_addr;
# 保存了服务器的IP地址
$server_name;
# 请求的服务器的主机名
$server_port;
# 请求的服务器的端口号
$http_<name>
# name为任意请求报文首部字段,表示记录请求报文的首部字段
$http_user_agent;
# 客户端浏览器的详细信息
$http_cookie;
# 客户端的cookie信息
$cookie_<name>
# name为任意请求报文首部字段cookie的key名
4. Nginx反向代理
4.1 Nginx代理服务
- 代理一词往往并不陌生, 该服务我们常常用到如(代理理财、代理租房、代理收货等等)

- 在没有代理模式的情况下,客户端和Nginx服务端,都是客户端直接请求服务端,服务端直接响应客户端。

- 那么在互联网请求里面,客户端往往无法直接向服务端发起请求,那么就需要用到代理服务,来实现客户端和服务通信
4.2 Nginx代理服务常见模式
- Nginx作为代理服务,按照应用场景模式进行总结,代理分为正向代理、反向代理
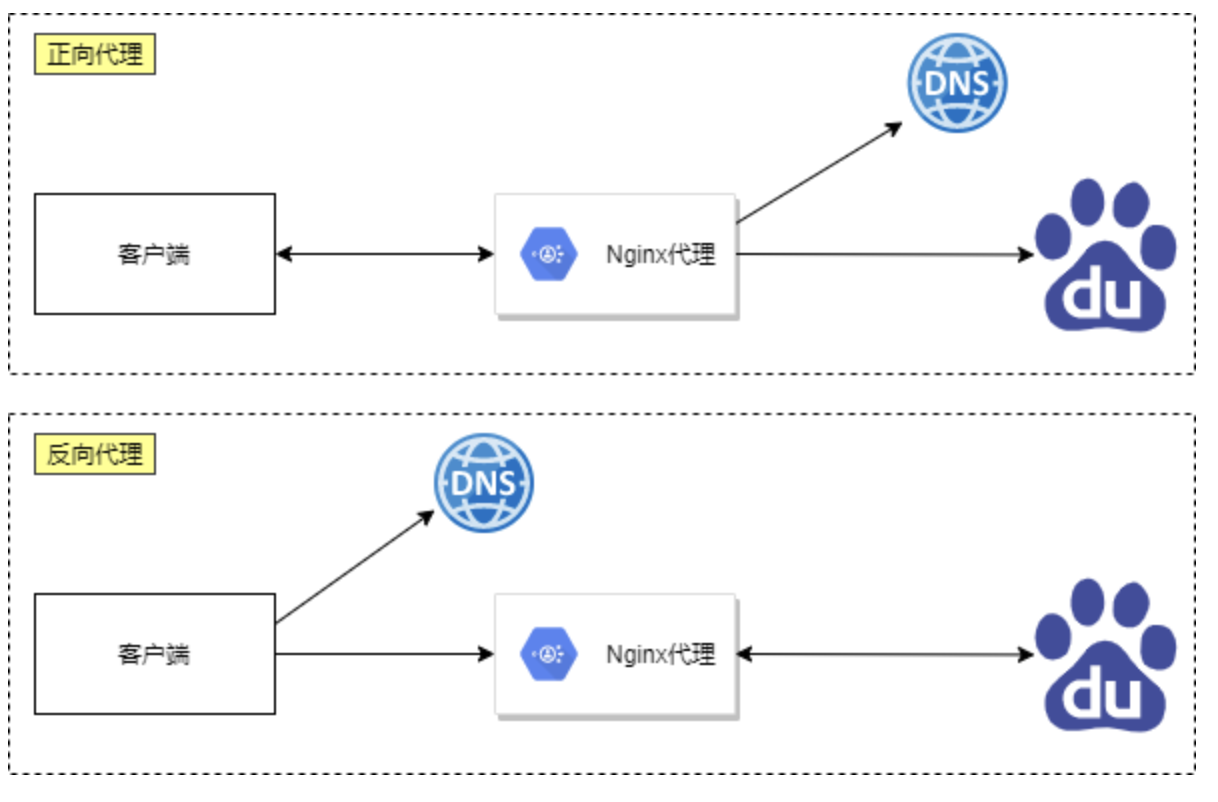
正向代理与反向代理的区别
- 区别在于形式上服务的”对象”不一样
- 正向代理代理的对象是客户端,为客户端服务
- 反向代理代理的对象是服务端,为服务端服务
4.3 Nginx代理服务支持协议
- Nginx作为代理服务,可支持的代理协议非常的多
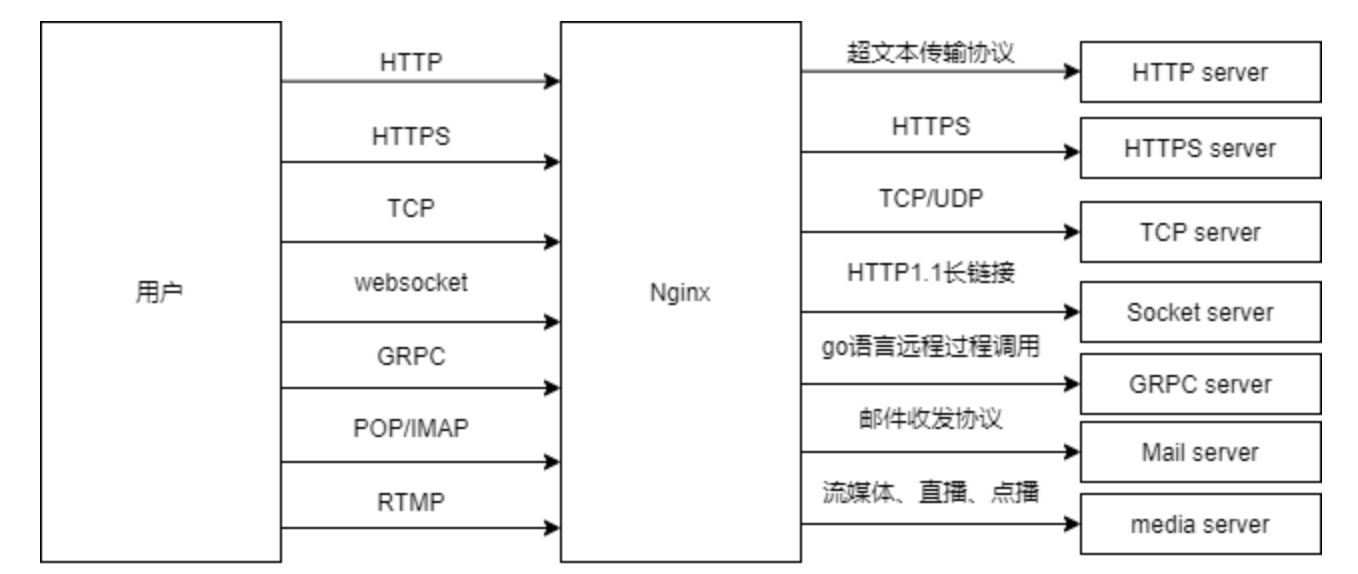
- 如果将Nginx作为反向代理服务,常常会用到如下几种代理协议
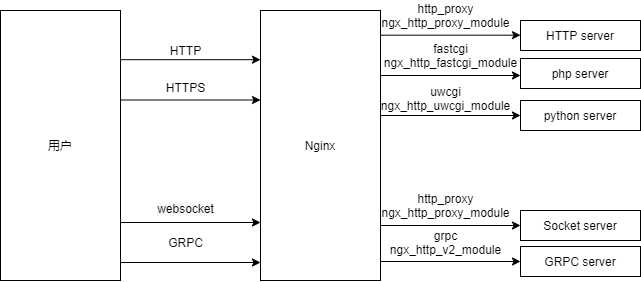
4.4 Nginx反向代理配置语法(了解)
- 代理配置语法
Syntax:    proxy_pass URL;
Default:    —
Context:    location, if in location, limit_except

http://localhost:8000/uri/
http://192.168.56.11:8000/uri/
http://unix:/tmp/backend.socket:/uri/
- url跳转修改返回Location[不常用]
Syntax:    proxy_redirect default;
proxy_redirect off;proxy_redirect redirect replacement;
Default:    proxy_redirect default;
Context:    http, server, location
- 添加发往后端服务器的请求头信息
Syntax:    proxy_set_header field value;
Default:    proxy_set_header Host $proxy_host;
            proxy_set_header Connection close;
Context:    http, server, location

# 用户请求的时候HOST的值是www.test.com, 那么代理服务会像后端传递请求的还是www.test.com
proxy_set_header Host $http_host;
# 将$remote_addr的值放进变量X-Real-IP中,$remote_addr的值为客户端的ip
proxy_set_header X-Real-IP $remote_addr;
# 客户端通过代理服务访问后端服务, 后端服务通过该变量会记录真实客户端地址
proxy_set_header X-Forwarded-For $proxy_add_x_forwarded_for;
- 代理到后端的TCP连接、响应、返回等超时时间
//nginx代理与后端服务器连接超时时间(代理连接超时)
Syntax: proxy_connect_timeout time;
Default: proxy_connect_timeout 60s;
Context: http, server, location

//nginx代理等待后端服务器的响应时间
Syntax:    proxy_read_timeout time;
Default:    proxy_read_timeout 60s;
Context:    http, server, location

//后端服务器数据回传给nginx代理超时时间
Syntax: proxy_send_timeout time;
Default: proxy_send_timeout 60s;
Context: http, server, location
- proxy_buffer代理缓冲区
//nignx会把后端返回的内容先放到缓冲区当中,然后再返回给客户端,边收边传, 不是全部接收完再传给客户端
Syntax: proxy_buffering on | off;
Default: proxy_buffering on;
Context: http, server, location

//设置nginx代理保存用户头信息的缓冲区大小
Syntax: proxy_buffer_size size;
Default: proxy_buffer_size 4k|8k;
Context: http, server, location

//proxy_buffers 缓冲区
Syntax: proxy_buffers number size;
Default: proxy_buffers 8 4k|8k;
Context: http, server, location
- 常用优化配置
- Proxy代理网站常用优化配置如下,将配置写入新文件,调用时使用include引用即可
[root@Nginx ~]# vim /etc/nginx/proxy_params
proxy_set_header Host $http_host;
proxy_set_header X-Real-IP $remote_addr;
proxy_set_header X-Forwarded-For $proxy_add_x_forwarded_for;

proxy_connect_timeout 30;
proxy_send_timeout 60;
proxy_read_timeout 60;

proxy_buffering on;
proxy_buffer_size 32k;
proxy_buffers 4 128k;
- 重复使用配置
- 代理配置location时调用方便后续多个Location重复使用
location / {
    proxy_pass http://127.0.0.1:8080;
    include proxy_params;
}
4.5 Nginx反向代理场景实践(了解)
- Nginx反向代理配置实例

- web01服务器,配置一个网站,监听在8080
[root@web01 ~]# cd /etc/nginx/conf.d/
[root@web01 conf.d]# vim web.conf
server {
    listen 8080;
    server_name localhost;

    location / {
        root /code/8080;
        index index.html;
        allow all;
    }
}
[root@web01 conf.d]# nginx -t
nginx: the configuration file /etc/nginx/nginx.conf syntax is ok
nginx: configuration file /etc/nginx/nginx.conf test is successful
[root@web01 conf.d]# systemctl restart nginx
[root@web01 ~]# mkdir -p /code/8080
[root@web01 ~]# echo "listening 8080 ..." > /code/8080/index.html
- proxy代理服务,配置监听80端口,使能够通过代理服务器访问到后端的192.168.175.20的8080端口站点内容
[root@proxy ~]# cd /etc/nginx/conf.d/
[root@proxy conf.d]# vim proxy_web_node1.conf
server {
    listen 80;
    server_name proxy.test.com;

    location / {
        proxy_pass http://192.168.175.20:8080;
    }
}
[root@proxy conf.d]# nginx -t
[root@proxy conf.d]# systemctl restart nginx
- 存在的问题,通过抓包可以看到客户端是使用域名对网站进行访问的,但是代理却是使用的IP地址加端口号
- 当访问80端口的时候,没有域名的情况下,默认会去找排在最上面的那个配置文件。
- 所以我们需要解决这个问题,保留住最开始的请求头部信息。
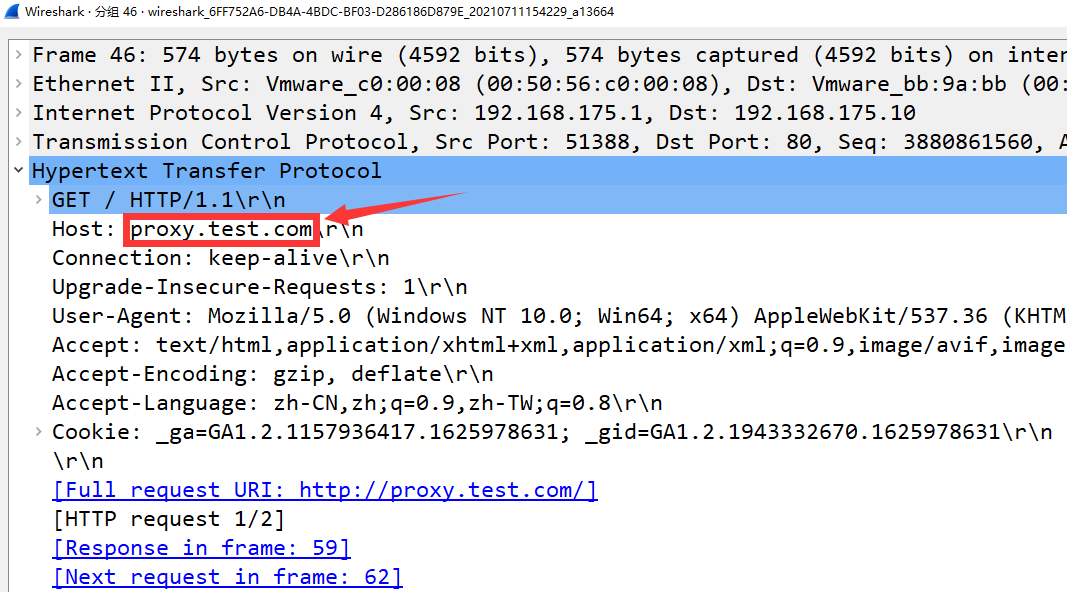
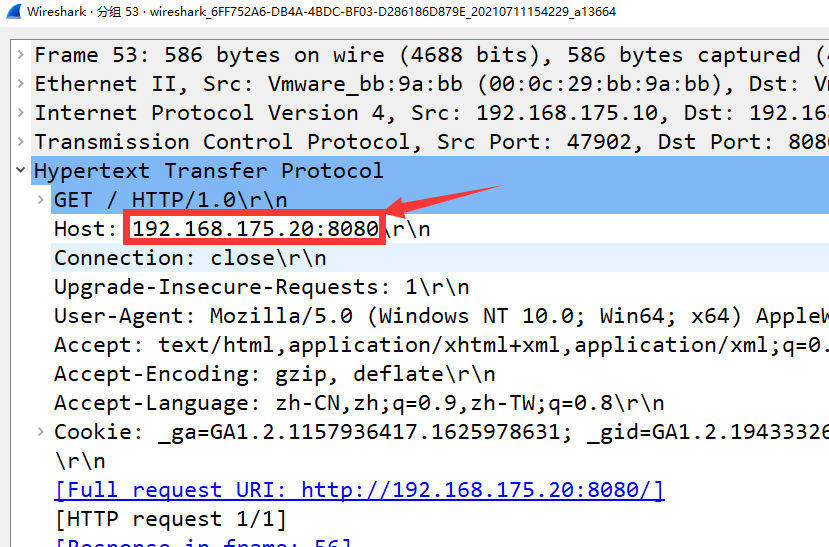
- 修改配置文件,使用
proxy_set_header模块
[root@proxy conf.d]# vim proxy_web_node1.conf
server {
    listen 80;
    server_name proxy.test.com;

    location / {
        proxy_pass http://192.168.175.20:8080;
        proxy_set_header Host $http_host;
    }
}
- 使用http1.1协议
server {
    listen 80;
    server_name proxy.test.com;

    location / {
        proxy_pass http://192.168.175.20:8080;
        proxy_set_header Host $http_host;
        proxy_http_version 1.1;
    }
}
- 在生产环境中,我们必须要记录客户端的来源IP,如果所有的访问日志,全都来源于代理,那么我们根本不知道都有哪些地区的用户访问了我们什么页面。
- 还需要使用
proxy_set_header
- 还需要使用
server {
    listen 80;
    server_name proxy.test.com;

    location / {
        proxy_pass http://192.168.175.20:8080;
        proxy_set_header Host $http_host;
        proxy_http_version 1.1;
        proxy_set_header X-Forwarded-For $proxy_add_x_forwarded_for;
    }
}
5. LNMP 架构概述
LNMP是一套技术的组合,L=Linux、N=Nginx、M=MySQL、P=PHP
5.1 如何工作
- 首先 nginx 服务是不能处理动态请求,那么当用户发起动态请求时,nginx 无法处理
- 当用户发起 http 请求,请求会被 nginx 处理,如果是静态资源请求 nginx 则直接返回,如果是动态请求 nginx 则通过 fastcgi 协议转交给后端的 PHP 程序处理

5.2 工作流程
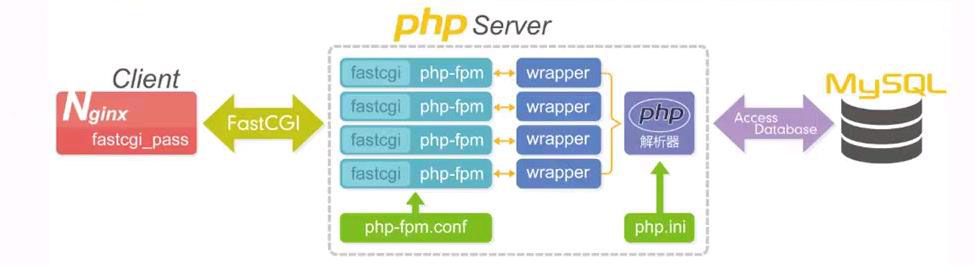
- 用户通过 http 协议发起请求,请求会先抵达 LNM P架构中的nginx
- nginx 会根据用户的请求进行location规则匹配
- location 如果匹配到请求是静态,则由 nginx 读取本地直接返回
- location 如果匹配到请求是动态,则由 nginx 将请求转发给 fastcgi 协议
- fastcgi 收到请求交给 php-fpm 管理进程,php-fpm 管理进程接收到后会调用具体的工作进程 wrapper
- wrapper 进程会调用 PHP 程序进行解析,如果只是解析代码,php 直接返回
- 如果有查询数据库操作,则由 php 连接数据库(用户 密码 ip)发起查询的操作
5.3 部署安装
# 安装 nginx:如果编译安装可以跳过
[root@localhost ~]# yum install nginx -y
# 启动
[root@localhost ~]# systemctl start nginx && systemctl enable nginx
# 查看Nginx状态,active即可
[root@localhost ~]# systemctl status nginx
# 关闭防火墙和SELINUX
[root@localhost ~]# systemctl stop firewalld && systemctl disable firewalld
[root@localhost ~]# setenforce 0
[root@localhost ~]# sed -i 's/SELINUX=enforcing/SELINUX=disabled/' /etc/selinux/config
# 安装 php 全家桶
[root@localhost ~]# yum install php* -y
# 更新 php-fmp listen 配置项
[root@localhost ~]# vim /etc/php-fpm.d/www.conf
......
;listen = /run/php-fpm/www.sock # 注释掉 Unix Socket 方式
listen = 9000 # 改为 TCP 端口方式
user = nginx # 找到user配置,改为nginx
group = nginx# 找到group配置,改为nginx
......
# 启动并设置开机自启
[root@localhost ~]# systemctl enable --now php-fpm
# 安装 marinedb 数据库
[root@localhost ~]# yum install -y mariadb-server mariadb
# 启动数据库服务
[root@localhost ~]# systemctl enable --now mariadb
# 设置数据库 root 用户密码
[root@localhost ~]# mysqladmin password '123456'
[root@localhost ~]# mysql -uroot -p123456 -e "show databases;"
+--------------------+
| Database           |
+--------------------+
| information_schema |
| mysql              |
| performance_schema |
+--------------------+
# 准备测试页面
[root@localhost ~]# mkdir -pv /data/nginx/lnmp
[root@localhost ~]# cat << EOF > /data/nginx/lnmp/index.php
<?php
    phpinfo();
?>
EOF
# 测试 index.php 运行正确
[root@localhost ~]# php /data/nginx/lnmp/index.php
# 添加 nginx vhost 配置文件:将 php 请求转给 php-fpm 处理
[root@localhost ~]# cat > /etc/nginx/conf.d/php.conf <<'EOF'
server {
    listen 8081;
    server_name php.iproot.cn;
    root /data/nginx/lnmp;
    index index.php index.html;

    location / {
        try_files $uri $uri/ /index.php?$query_string;
    }

    location ~ \.php$ {
        try_files $uri =404;  # 安全:防止恶意请求
        # 配置 fastcgi_pass(PHP-FPM 地址)
        fastcgi_pass 127.0.0.1:9000;
        # 配置 fastcgi_index(默认首页)
        fastcgi_index index.php;
        # 配置 fastcgi_param(传递脚本路径)
        # 注意:使用英文双引号,不是中文引号
        fastcgi_param SCRIPT_FILENAME "$document_root$fastcgi_script_name";
        # 引入默认 fastcgi 参数
        include fastcgi_params;
    }
}
EOF
[root@localhost ~]# nginx -s reload
# 测试验证,最后ip地址替换为自己的虚拟机的ip地址
[root@localhost ~]# curl -I -H 'Host: php.iproot.cn' 192.168.159.148:8081
HTTP/1.1 200 OK
Server: nginx/1.20.1
5.4 相关配置
fastcgi是 Nginx 与 PHP-FPM 通信的核心配置
5.4.1 配置指令解析
| 指令 | 作用 | 应设置的值 |
|---|---|---|
fastcgi_pass |
指定 PHP-FPM 的地址 决定 Nginx 将 PHP 请求发送到何处 | 127.0.0.1:9000(因为 PHP-FPM 监听 9000 端口) |
fastcgi_index |
设置默认 PHP 首页 当访问目录时自动查找的文件 | index.php |
fastcgi_param |
传递环境变量 告诉 PHP-FPM 脚本文件的真实路径 | SCRIPT_FILENAME $document_root$fastcgi_script_name |
5.4.2 配置原理详解

关键变量解释
在我们实验的实际环境中:
$document_root=/data/nginx/lnmp$fastcgi_script_name=/index.php"$document_root$fastcgi_script_name"=/data/nginx/lnmp/index.php
5.4.4 验证配置是否生效
# 方法 1:查看 Nginx 实际加载的配置
nginx -T | grep -A 20 'server_name php.iproot.cn'

# 方法 2:测试访问
curl -I -H 'Host: php.iproot.cn' 192.168.159.148:8081 # 200OK
5.5 数据库管理应用
为了方便的使用数据库,我们可以安装数据库图形化管理工具 phpmyadmin
5.5.1 安装部署
# 为数据库管理工具创建虚拟主机
[root@localhost ~]# cat > /etc/nginx/conf.d/phpmyadmin.conf <<'EOF'
server {
    listen 8080;                          # 监听8080 端口
    root /data/nginx/phpmyadmin;          # 统一路径到 /data/nginx/
    index index.php;

    location / {
        try_files $uri $uri/ /index.php?$query_string;
    }

    location ~ \.php$ {
        try_files $uri =404;

        fastcgi_pass 127.0.0.1:9000;
        fastcgi_index index.php;
        fastcgi_param SCRIPT_FILENAME "$document_root$fastcgi_script_name";
        include fastcgi_params;
    }
}
EOF
完整部署操作步骤
# 2. 创建统一目录结构
mkdir -p /data/nginx/phpmyadmin

# 3. 下载并解压 phpMyAdmin
cd /tmp
wget https://files.phpmyadmin.net/phpMyAdmin/5.1.1/phpMyAdmin-5.1.1-all-languages.zip

# 4. 解压到目标目录
unzip phpMyAdmin-5.1.1-all-languages.zip
mv phpMyAdmin-5.1.1-all-languages/* /data/nginx/phpmyadmin/

# 5. 清理临时文件
rm -rf phpMyAdmin-5.1.1-all-languages.zip phpMyAdmin-5.1.1-all-languages

# 6. 设置 Session 目录权限
mkdir -p /var/lib/php/session
chown nginx:nginx /var/lib/php/session

# 7. 确保 phpMyAdmin 目录权限正确
chown -R nginx:nginx /data/nginx/phpmyadmin

# 8. 测试配置并重载 Nginx
nginx -t
systemctl reload nginx

# 9. 查看端口是否监听成功
ss -tnlp | grep 8080
如何访问 phpMyAdmin
# 浏览器访问:http://192.168.159.148:8080
# 应该看到 phpMyAdmin 登录页面

输入数据库用户名 root 和密码 123456 就可以进入图形化数据库管理页面了

如果出现错误”Failed to set session cookie. Maybe you are using HTTP instead of HTTPS to access phpMyAdmin.“
这个错误是 phpMyAdmin 的安全机制阻止在 HTTP 环境下设置 Session Cookie。开发测试环境需要修改配置来允许 HTTP 访问。
解决方法:
步骤 1:修复 phpMyAdmin Cookie 错误
# 进入 phpMyAdmin 目录
cd /data/nginx/phpmyadmin

# 创建配置文件
cp config.sample.inc.php config.inc.php

# 禁用强制 HTTPS(允许 HTTP 访问)
sed -i "s/\$cfg\['ForceSSL'\] = true;/\$cfg['ForceSSL'] = false;/" config.inc.php

# 设置安全的 blowfish_secret
SECRET=$(openssl rand -base64 32)
sed -i "s/\$cfg\['blowfish_secret'\] = '';/\$cfg['blowfish_secret'] = '$SECRET';/" config.inc.php

# 添加 SameSite 配置(推荐)
echo "\$cfg['CookieSameSite'] = 'Lax';" >> config.inc.php
步骤 2:重启服务使配置生效
# 重启 PHP-FPM
systemctl restart php-fpm

# 重启 Nginx
nginx -s reload

# 确认服务正常运行
systemctl is-active nginx php-fpm
步骤 3:验证权限设置
# 检查 Session 目录权限
ls -ld /var/lib/php/session
# 应显示:drwxr-xr-x  nginx nginx

# 检查 phpMyAdmin 目录权限
ls -ld /data/nginx/phpmyadmin
# 应显示:drwxr-xr-x  nginx nginx

# 验证 nginx 用户可读取
sudo -u nginx cat /data/nginx/phpmyadmin/index.php
# 应成功输出 PHP 代码

# 验证 nginx 用户可写入 Session
sudo -u nginx touch /var/lib/php/session/test
# 应成功创建文件(记得删除 rm /var/lib/php/session/test)
步骤 4:清除浏览器 Cookie 并访问
清除旧 Cookie:浏览器设置 → 清除 Cookie 和站点数据
或使用无痕模式:直接打开浏览器无痕窗口
访问 phpMyAdmin:
http://192.168.159.148:8080
5.6 博客系统
5.6.1 部署虚拟主机
# 为博客创建虚拟主机
# 1. 为博客创建 Nginx 配置(监听 80 端口)
[root@localhost ~]# cat > /etc/nginx/conf.d/typecho.conf <<'EOF'
server {
    listen 80 default_server;
    server_name _;        # _ 允许 IP 直接访问
    root /data/nginx/typecho;             # 统一路径到 /data/nginx/
    index index.php index.html;

    location / {
        try_files $uri $uri/ /index.php?$query_string;
    }

    location ~ \.php$ {
        try_files $uri =404;              # 安全:防止恶意请求

        fastcgi_pass   127.0.0.1:9000;
        fastcgi_index  index.php;
        fastcgi_param  SCRIPT_FILENAME "$document_root$fastcgi_script_name";
        include        fastcgi_params;
    }
}
EOF
# 2. 测试 Nginx 配置
[root@localhost ~]# nginx -t

# 3. 重载 Nginx(无需 restart,reload 更平滑)
[root@localhost ~]# systemctl reload nginx

# 4. 创建统一目录
[root@localhost ~]# mkdir -p /data/nginx/typecho

# 5. 进入目录
[root@localhost ~]# cd /data/nginx/typecho

# 6. 下载 Typecho 最新版
[root@localhost ~]# wget https://github.com/typecho/typecho/releases/latest/download/typecho.zip

# 7. 解压源码
[root@localhost ~]# unzip typecho.zip

# 8. 设置权限(PHP-FPM 运行用户是 nginx)
[root@localhost ~]# chown -R nginx:nginx /data/nginx/typecho

# 9. 确保静态文件可读
[root@localhost ~]# chmod -R 755 /data/nginx/typecho
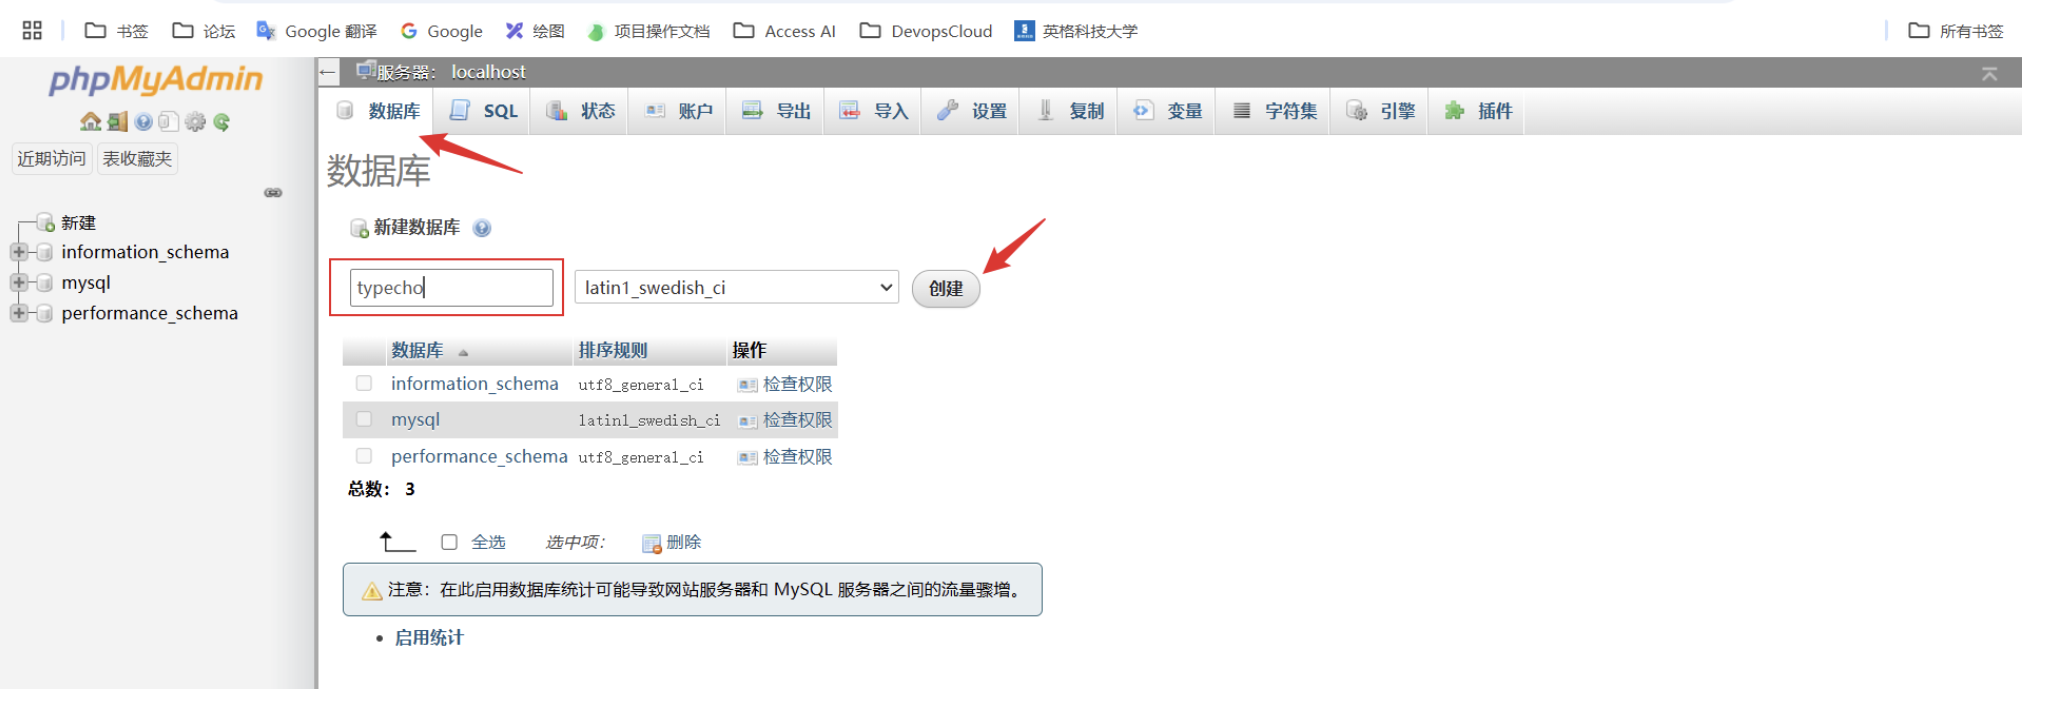
5.6.2 创建数据库
点击数据库,输入数据库名之后,就可以点击创建
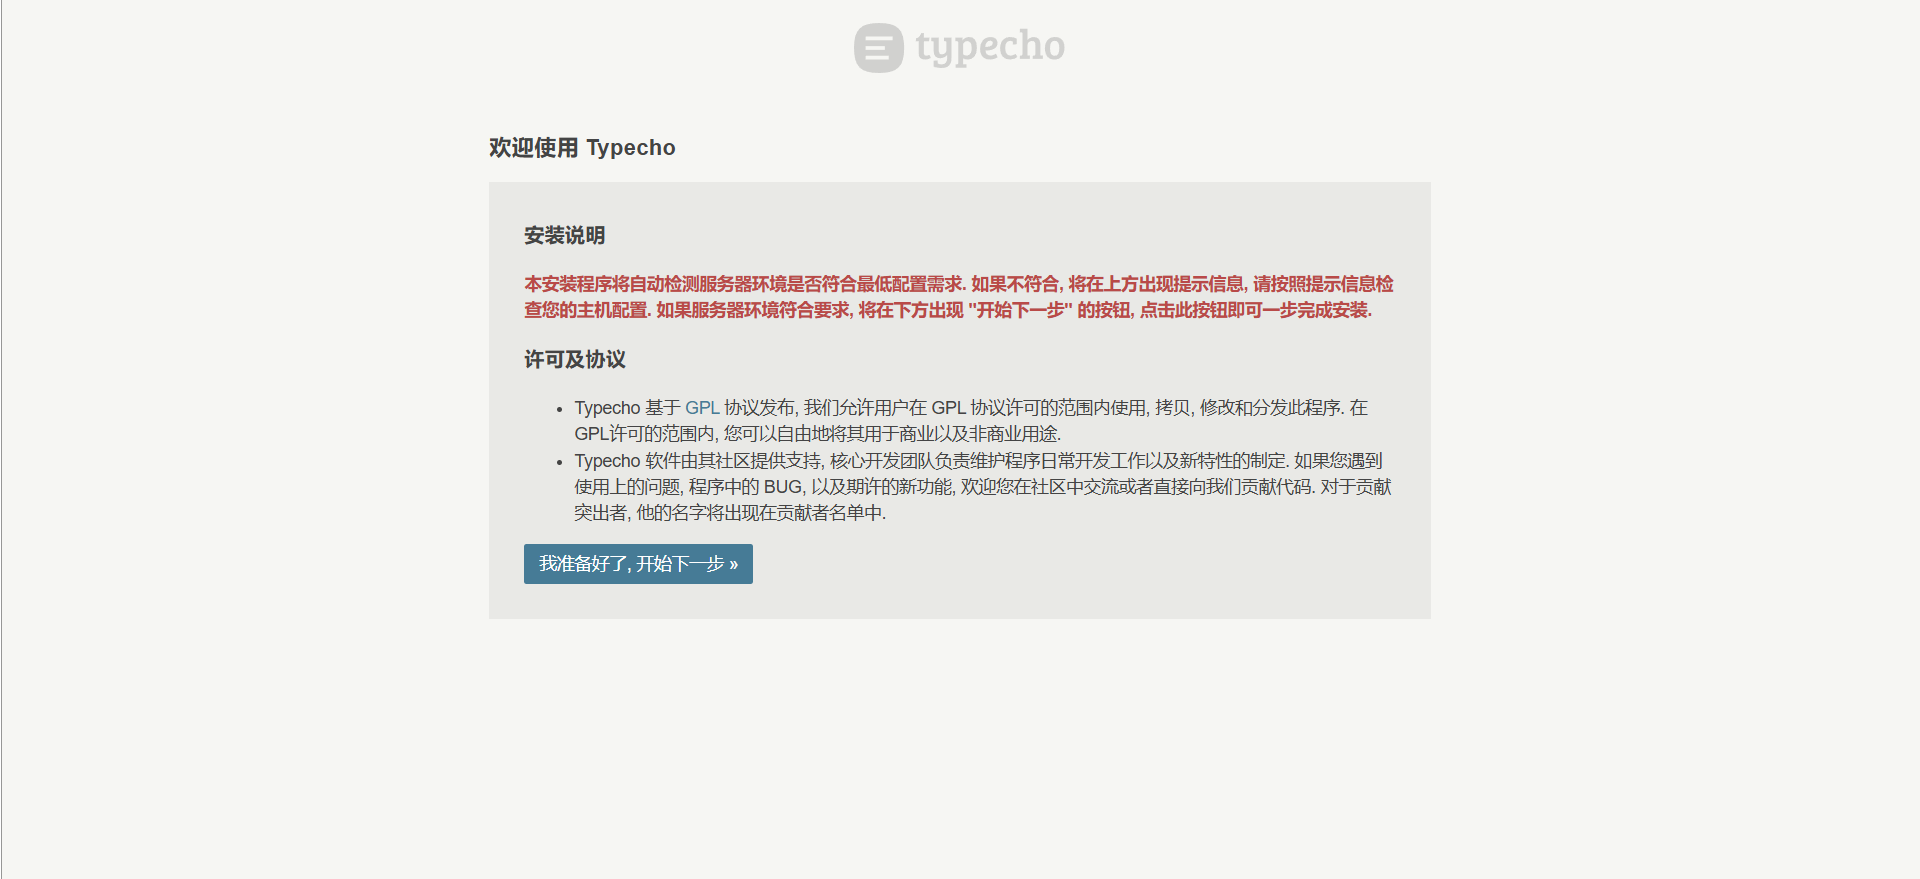
5.6.3 安装博客系统
浏览器访问:
http://192.168.159.148/ #ip记得换成你的虚拟机IP
下面就可以开始进入网站安装的部分了,访问博客系统页面
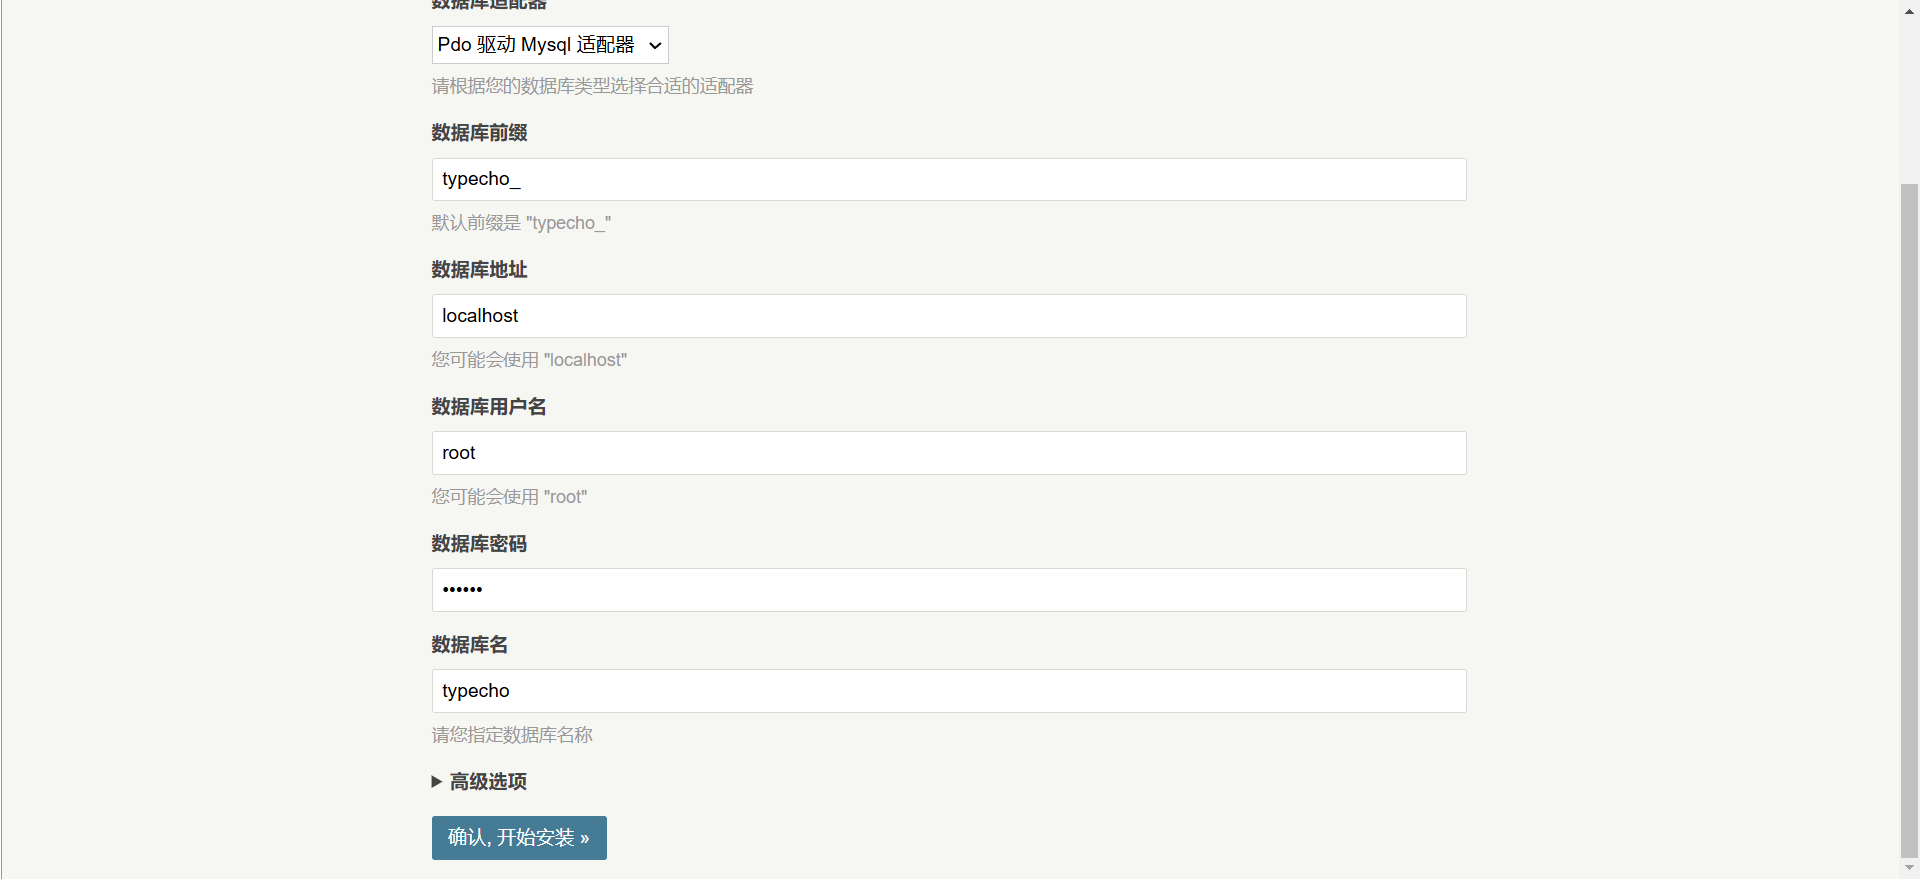
赋予网站根目录下usr/uploads目录权限
[root@localhost typecho]# chmod a+w usr/uploads/
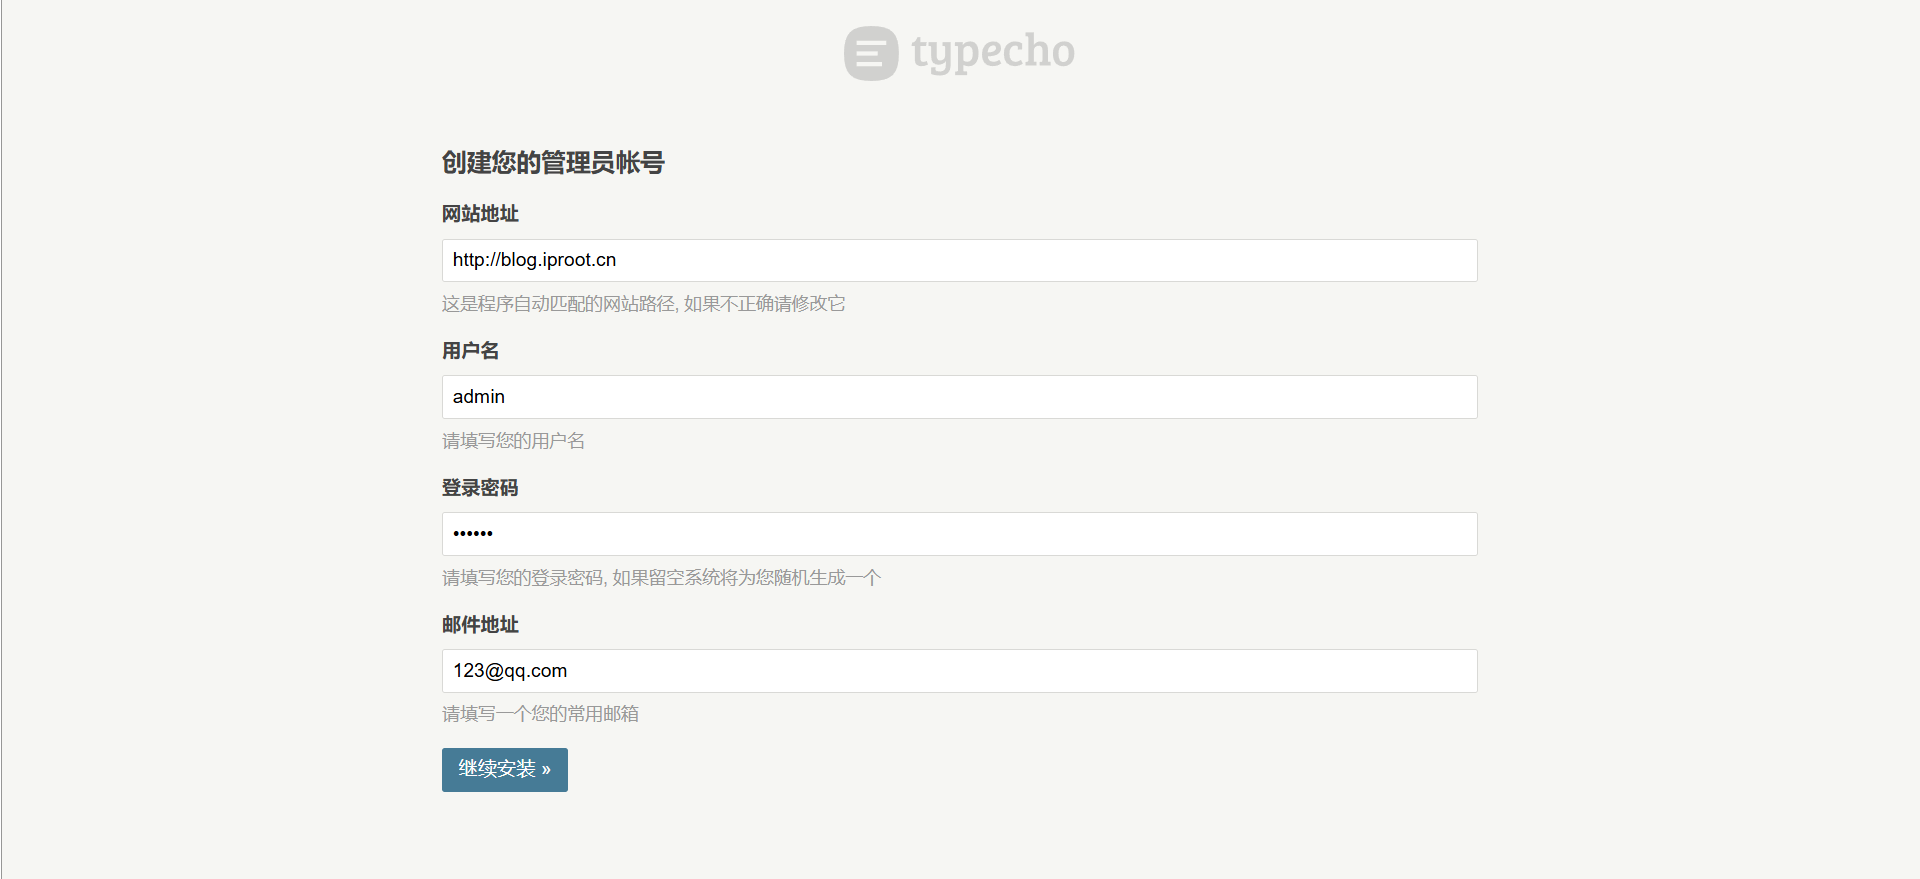
继续下一步,填写数据库密码和网站后台管理员密码
下面是安装成功的页面

5.7 切换主题
默认的主题如下,界面比较的简洁,我们可以给这个网站替换主题,也可以借此加深熟悉我们对Linux命令行的熟练程度

第三方主题商店:https://www.typechx.com/
我们尝试更换这个主题

选择模板下载

然后在打开的github仓库中下载ZIP压缩包
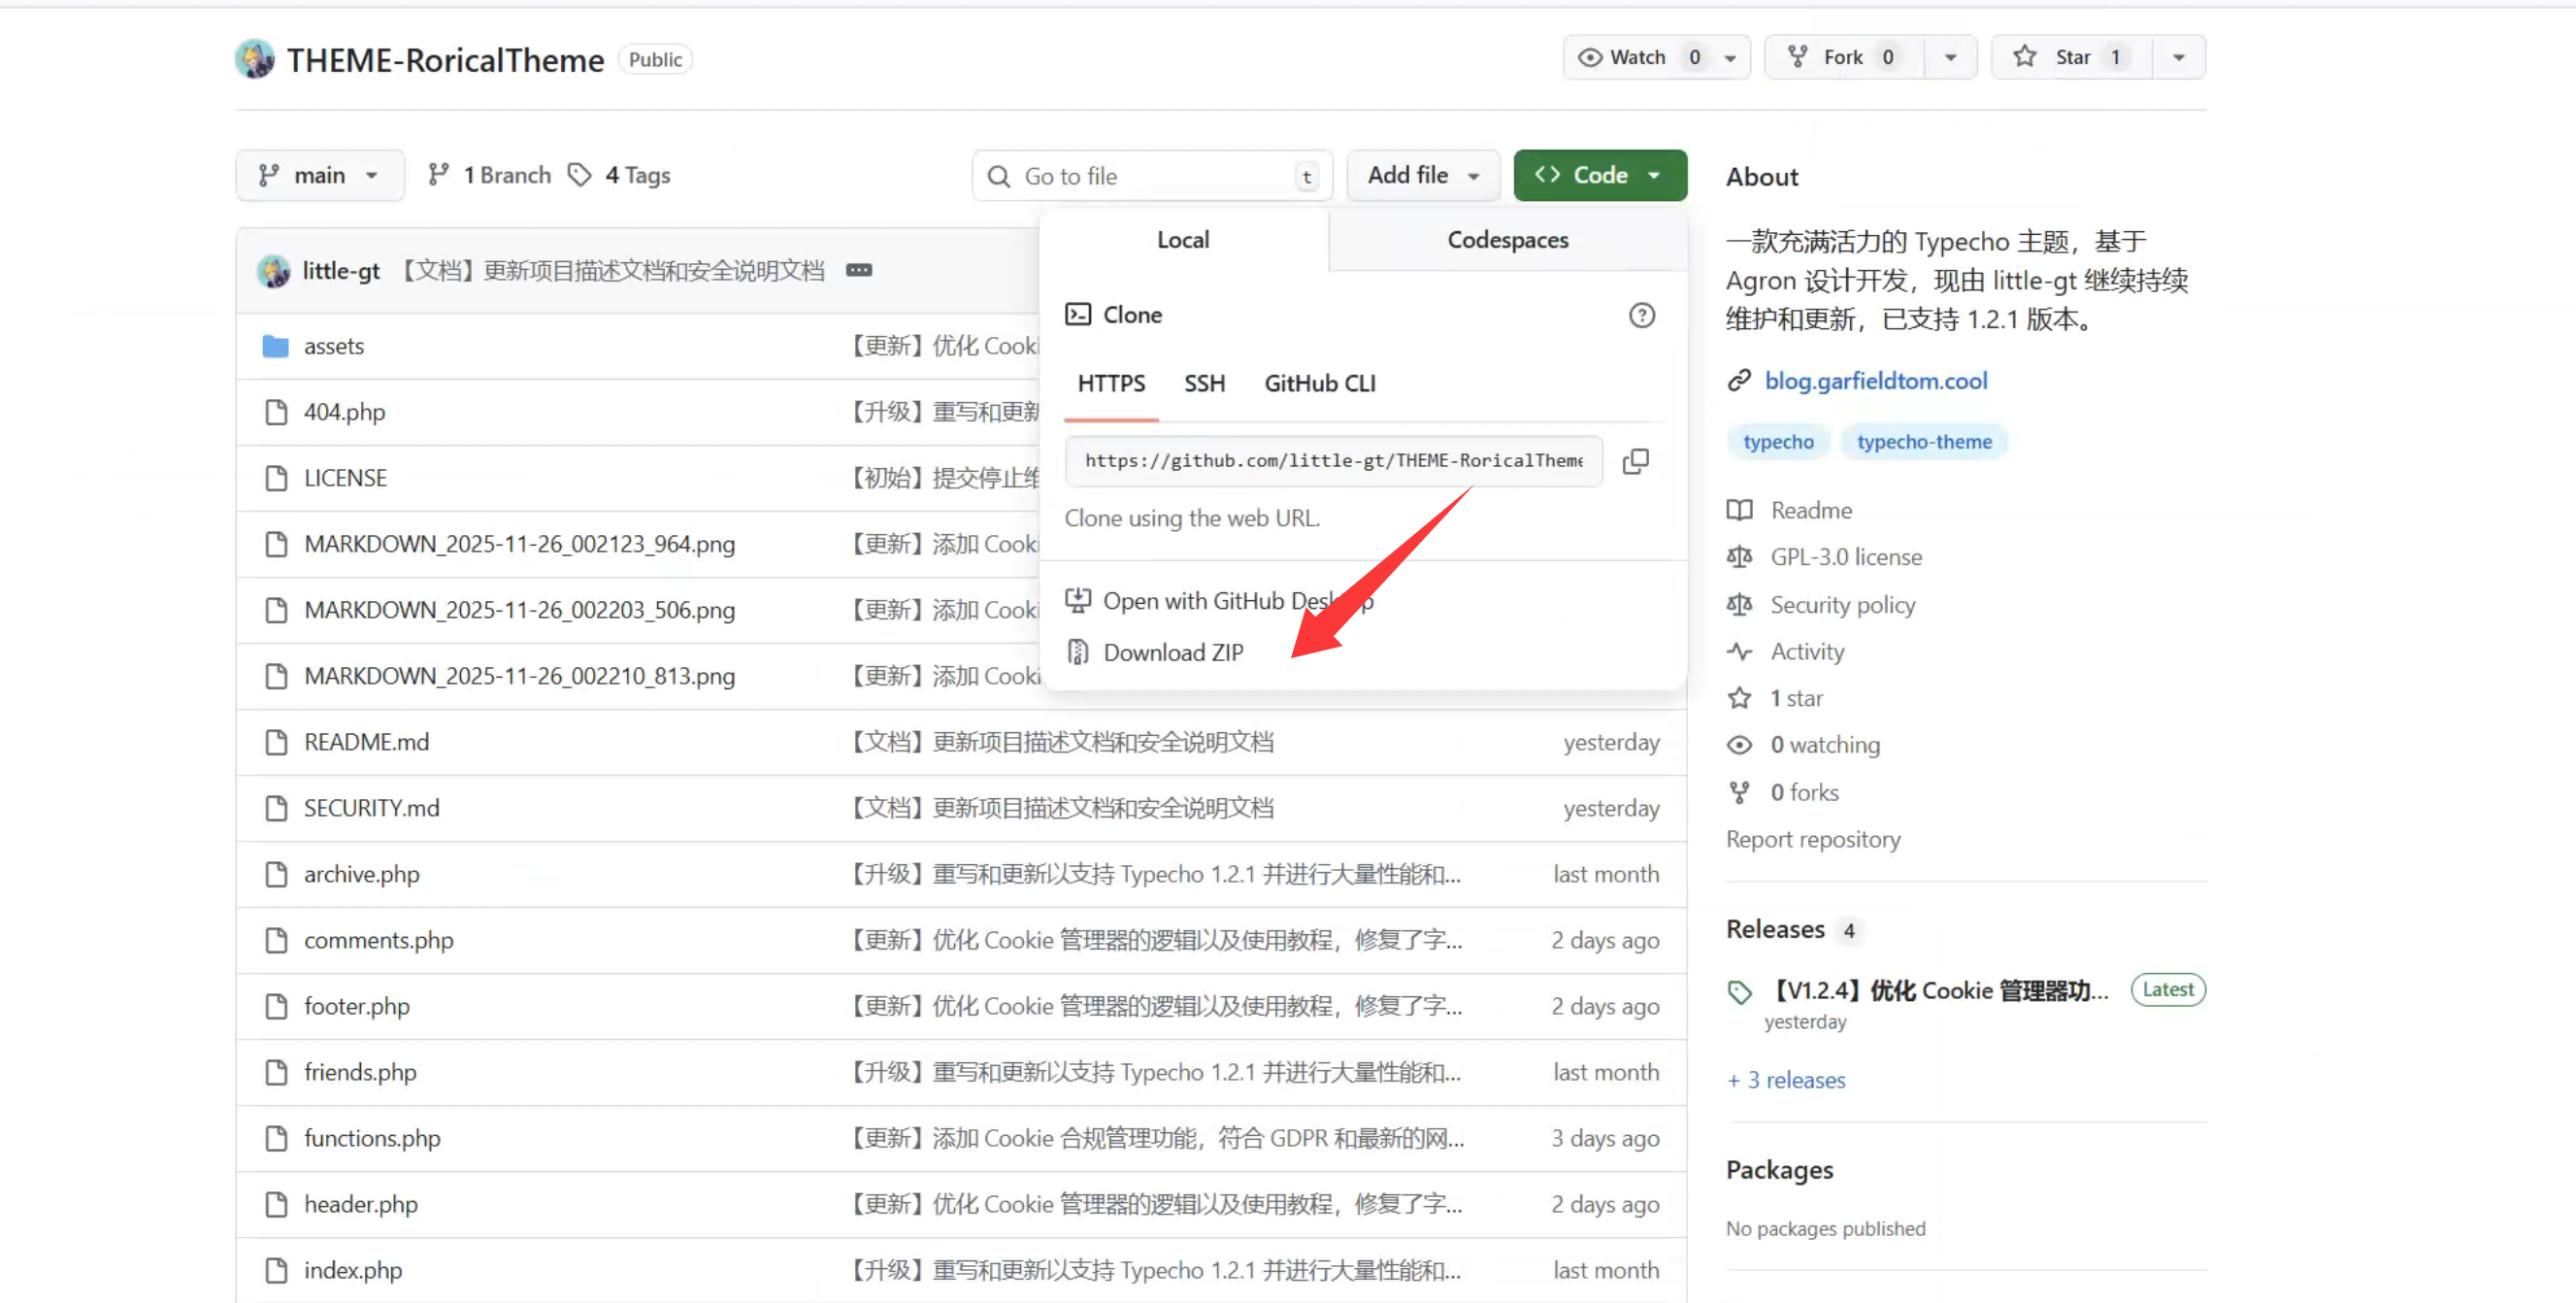
将下载好的主题压缩包上传到博客主题的目录/data/nginx/typecho/usr/themes
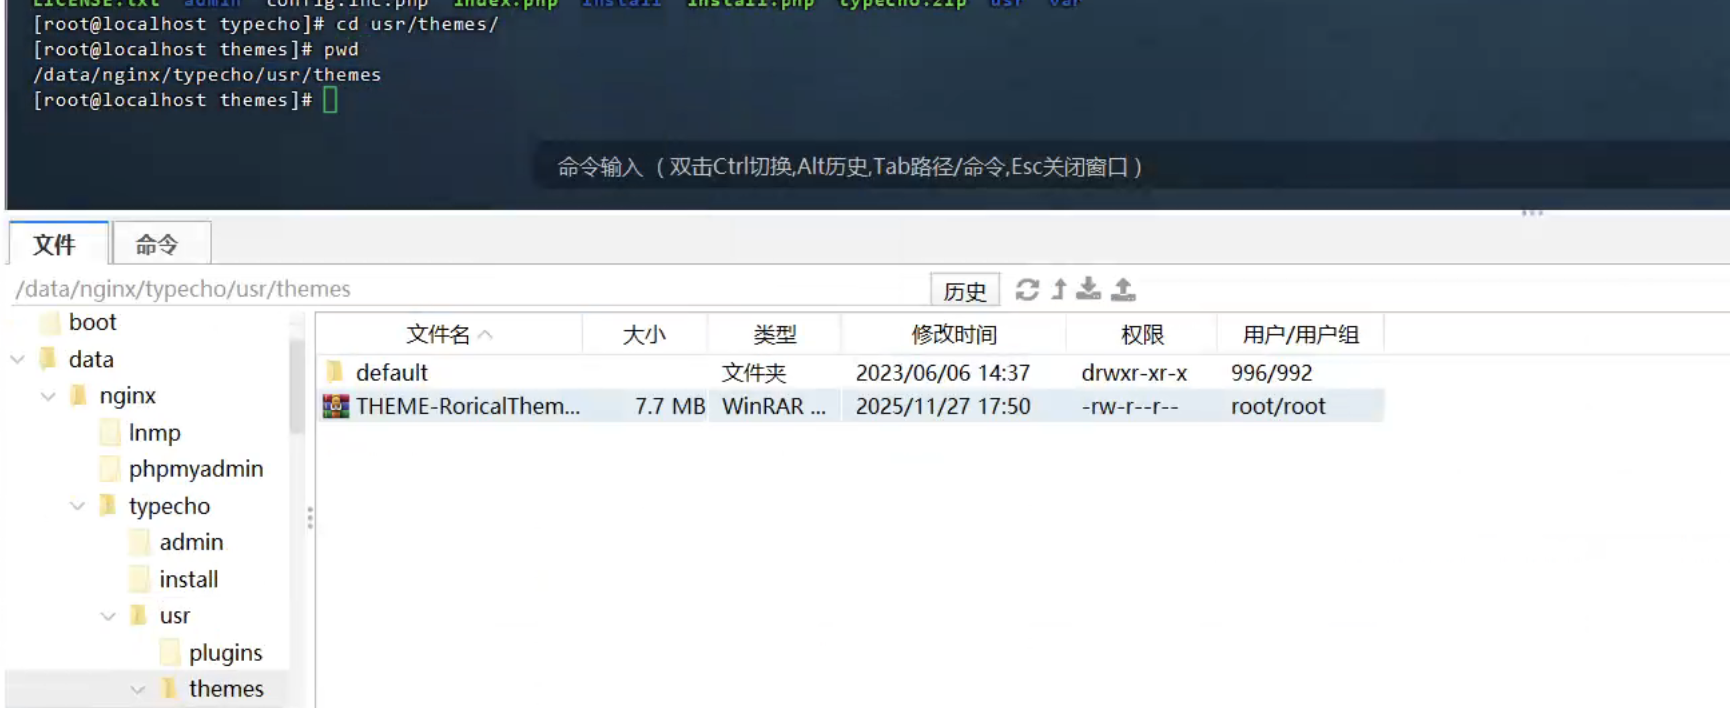
然后解压主题包,并且将名称改为简单一点的
[root@localhost themes]# unzip THEME-RoricalTheme-main.zip
[root@localhost themes]# ls
THEME-RoricalTheme-main  THEME-RoricalTheme-main.zip  default
[root@localhost themes]# mv THEME-RoricalTheme-main butterfly
[root@localhost themes]# rm -rf THEME-RoricalTheme-main.zip
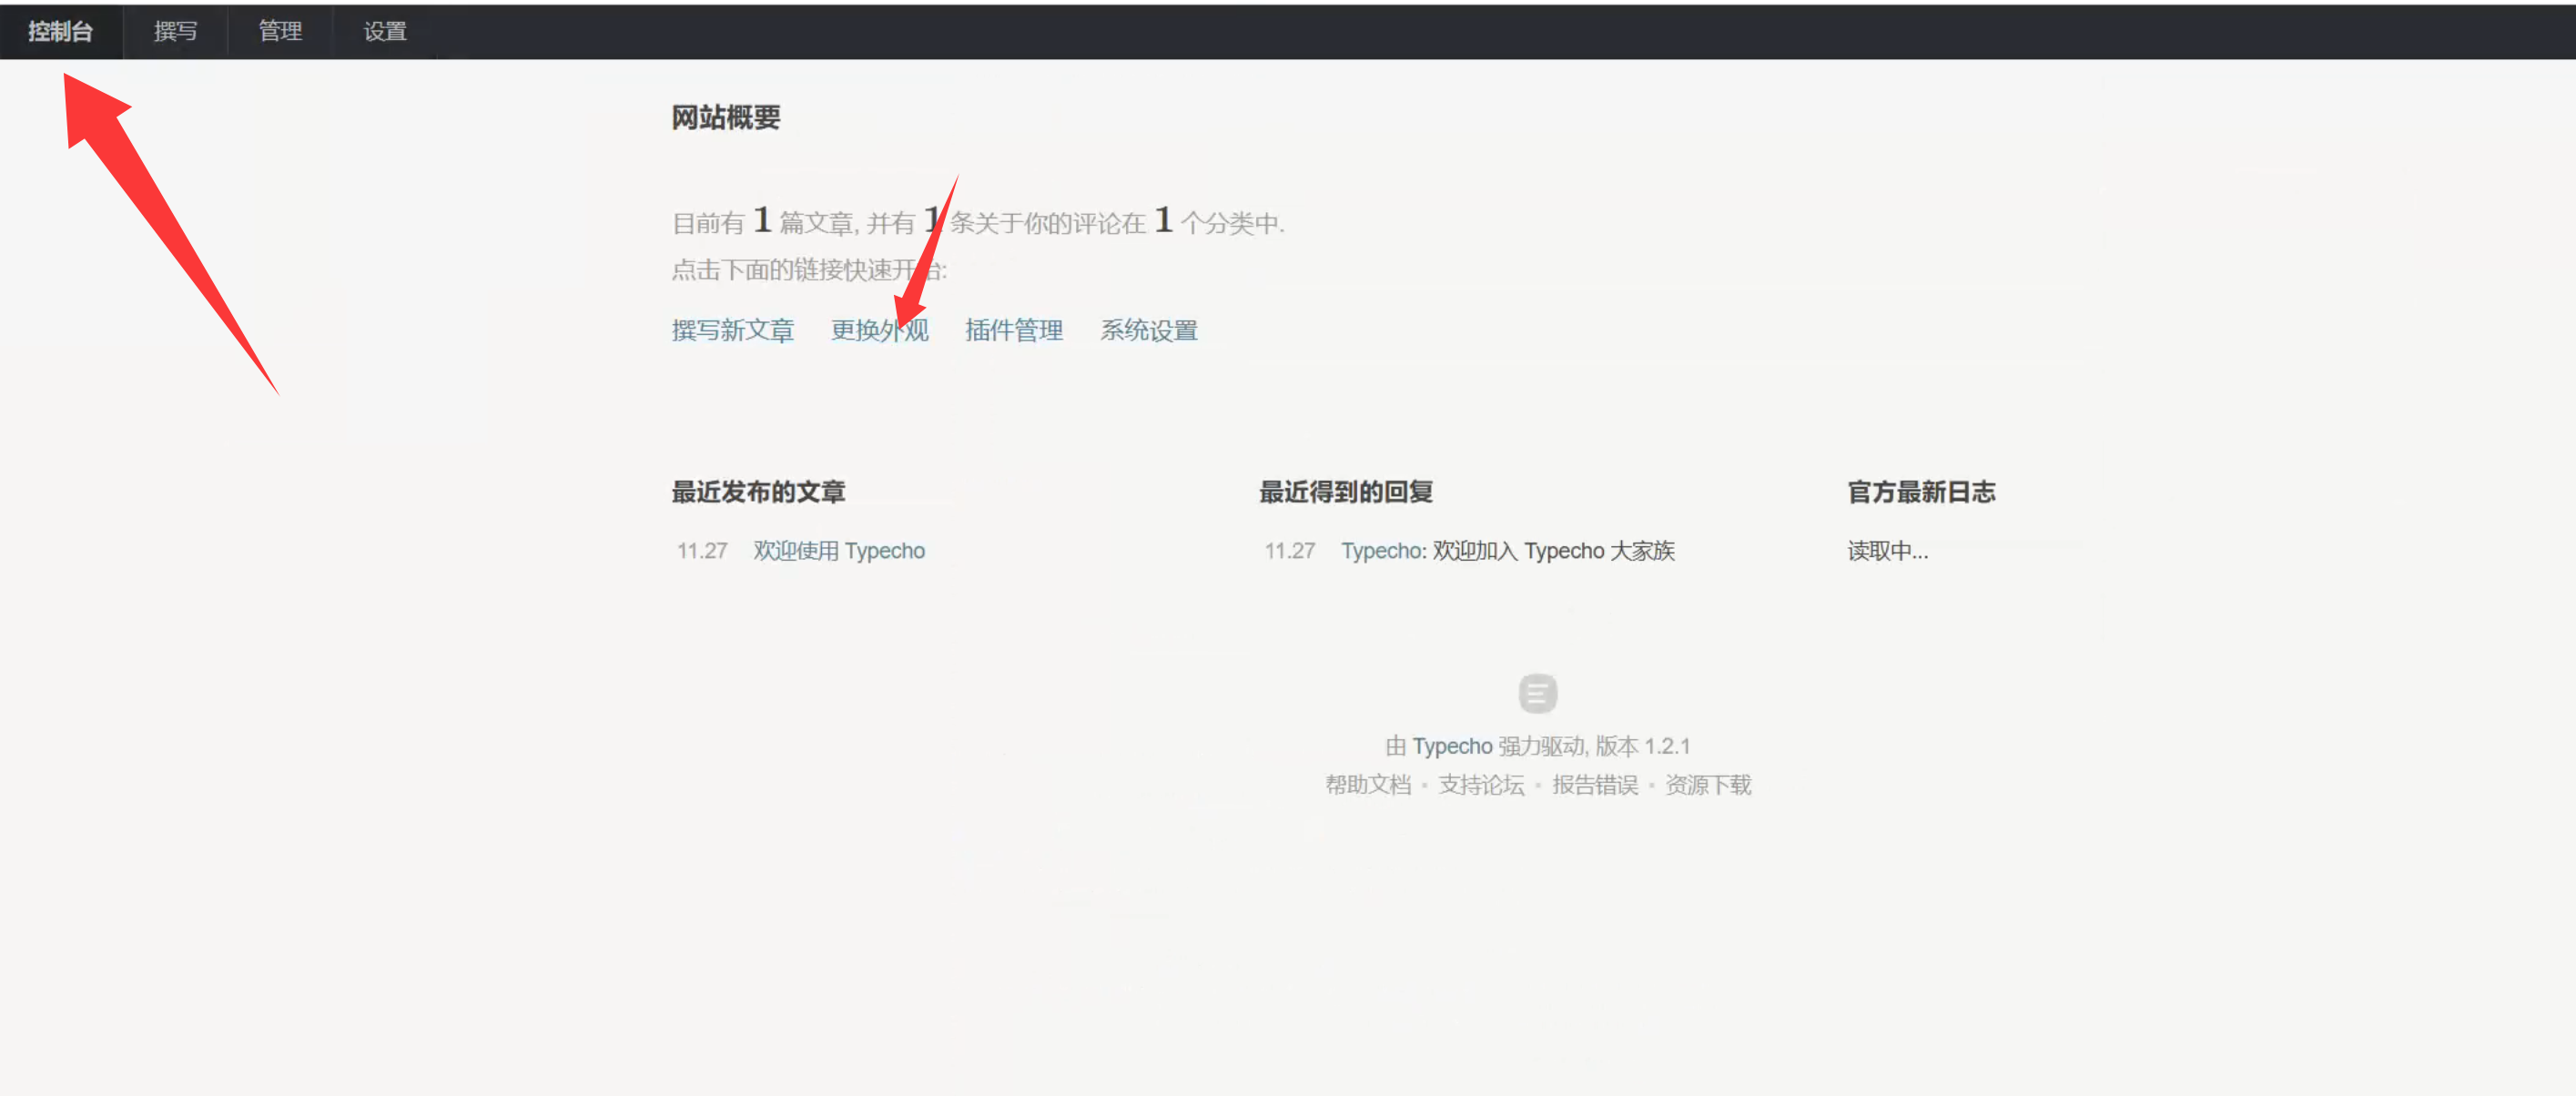
然后登录到博客后台,在设置里更换主题
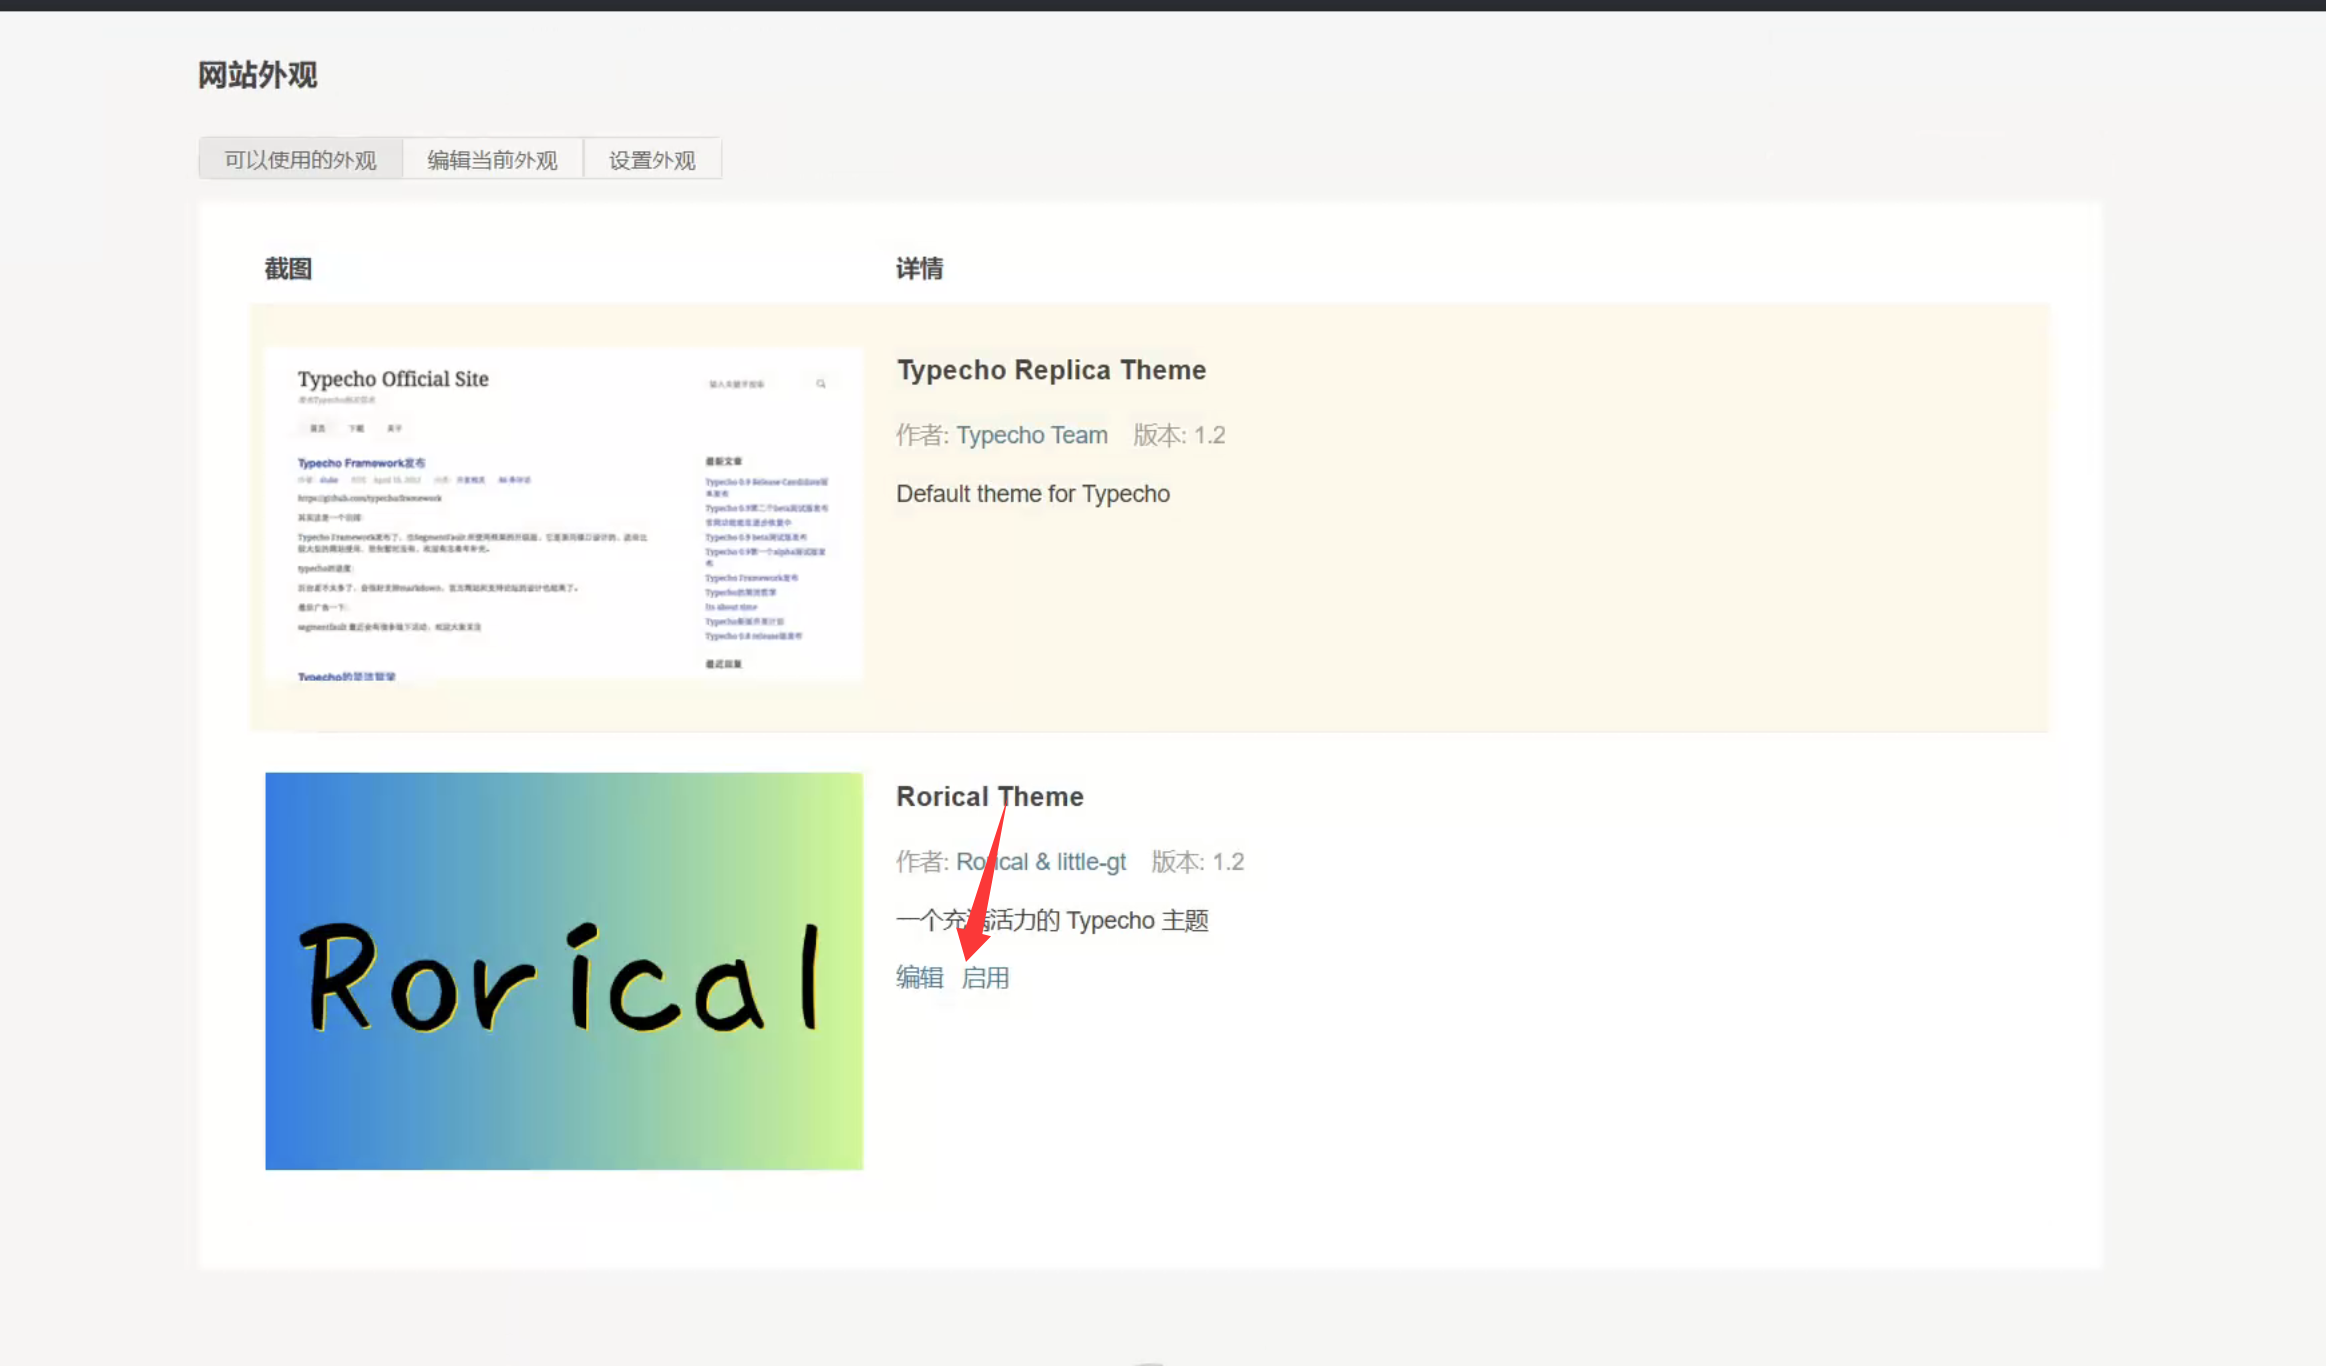
然后回到博客首页刷新一下,就可以看到新的主题已经应用了~

有可能会有一些图片资源的丢失,稍微了解一点前端知识,就可以将其完善好了。也可以自由选择自己喜欢的其他主题。
5.8 友情提示
如果各位同学不是搭建在自己虚拟机上的,是去租用阿里云或者腾讯云,直接搭建,并且购买域名,就可以让自己的网站在互联网上永远在线
6.使用宝塔面板使用LNMP架构安装 Typecho
6.1 安装宝塔面板
1.执行以下命令安装宝塔(CentOS/RockyLinux通用):
url=https://download.bt.cn/install/install_panel.sh;if [ -f /usr/bin/curl ];then curl -sSO $url;else wget -O install_panel.sh $url;fi;bash install_panel.sh ssl251104
- 安装完成后,会显示:
- 面板地址:
http://服务器IP:8888 - 用户名和密码(请妥善保存)
- 面板地址:
- 开放端口:如果在在服务器安装,防火墙/安全组中放行 8888、80、443、3306 等端口
6.2 配置运行环境
登录宝塔面板后,按以下步骤配置:
安装 LNMP/LAMP 环境
- 首次登录会提示安装套件,选择 LNMP(推荐)
- PHP:选择 7.4 或 8.0(Typecho 1.2+ 需要 PHP 7.2+)
- MySQL:选择 5.7 或 8.0
- Web服务器:Nginx
- 点击"一键安装",等待约10-20分钟完成
6.3 安装 Typecho(仅供参考,没试过,报错自己Ai一下~)
步骤 1:创建网站和数据库
- 点击左侧"网站" → "添加站点"
- 填写域名(如没有域名,先填IP)
- 勾选"创建数据库",选择 MySQL,记录数据库名、用户名和密码
- 提交后,网站目录为
/www/wwwroot/你的域名或ip
步骤 2:下载 Typecho
1.进入宝塔"终端"或SSH,执行:
cd /www/wwwroot/你的域名
wget https://github.com/typecho/typecho/releases/latest/download/typecho.zip
unzip typecho.zip
2.将解压后的所有文件移动到网站根目录:
mv typecho/* ./
rm -rf typecho.zip typecho/
步骤 3:设置权限
chmod -R 755 /www/wwwroot/你的域名
chown -R www:www /www/wwwroot/你的域名
步骤4:开始安装
浏览器访问:
http://192.168.159.148/ #ip记得换成你的虚拟机IP
剩下步骤同上,不多说。